
Building Microservices using Spring Boot + HarperDB and Deploying it on AWS

Senior Software Engineer. I write about practical tips and epic stories about my experiences in the field of computer science and engineering!
Introduction
In this article, you will learn how to use Spring Boot and HarperDB to create a microservice. Later on, you will also look at how to deploy the complete application on AWS Elastic Beanstalk.
You will be building an Employee Leave Management System. This application will be responsible for tracking the detailed record of employees' leaves. You will also be implementing the functionality to add, edit, and cancel leaves.
But first, let's get a basic understanding of microservices.
What are Microservices?
Microservices are another design architecture for developing software. In this, the software is composed of small independent services that communicate over REST APIs.
Microservices architectures make applications easier to develop and scale. It also enables an organization to evolve its technology stack easily later on if required.
Monolithic vs. Microservices
In monolithic architectures, all processes run as a single service, therefore, they are tightly coupled. This means that if one process goes down, the entire application will get affected leading to a single point of failure.
Also, enhancing or adding new features becomes more complicated as the code base grows. This complexity makes it difficult to experiment and implement new ideas.
In microservices architectures, an application is built by combining different components that run independently as a service. These services communicate over a well-defined interface of lightweight REST APIs.
Each service is responsible for performing a single task and because they run independently, each service can be updated, deployed, and scaled to meet the demand for specific functions of an application.
Introducing HarperDB
You are going to use HarperDB as your Database. HarperDB is a complete data management solution and distributed database with native SQL operations like join, order by, etc., and NoSQL schema-less or even API-based execution.
The most notable features of HarperDB are:
- It has one endpoint for all CRUD operations
- Execute SQL queries on JSON data
- Supports multiple plugins like ODBC, JDBC, Node-RED, etc.
- It has both SQL and NoSQL support
- Eliminates the need for an ORM(Object Relational Mapping) by returning the results as arrays of JSON
- Executes complex and ACID-compliant SQL queries on JSON without any data duplication
Looks interesting, doesn't it?
Configure HarperDB Database Instance
Let's now start with configuring the HarperDB instance:
Go to https://studio.harperdb.io/sign-up
Fill out the form with your details
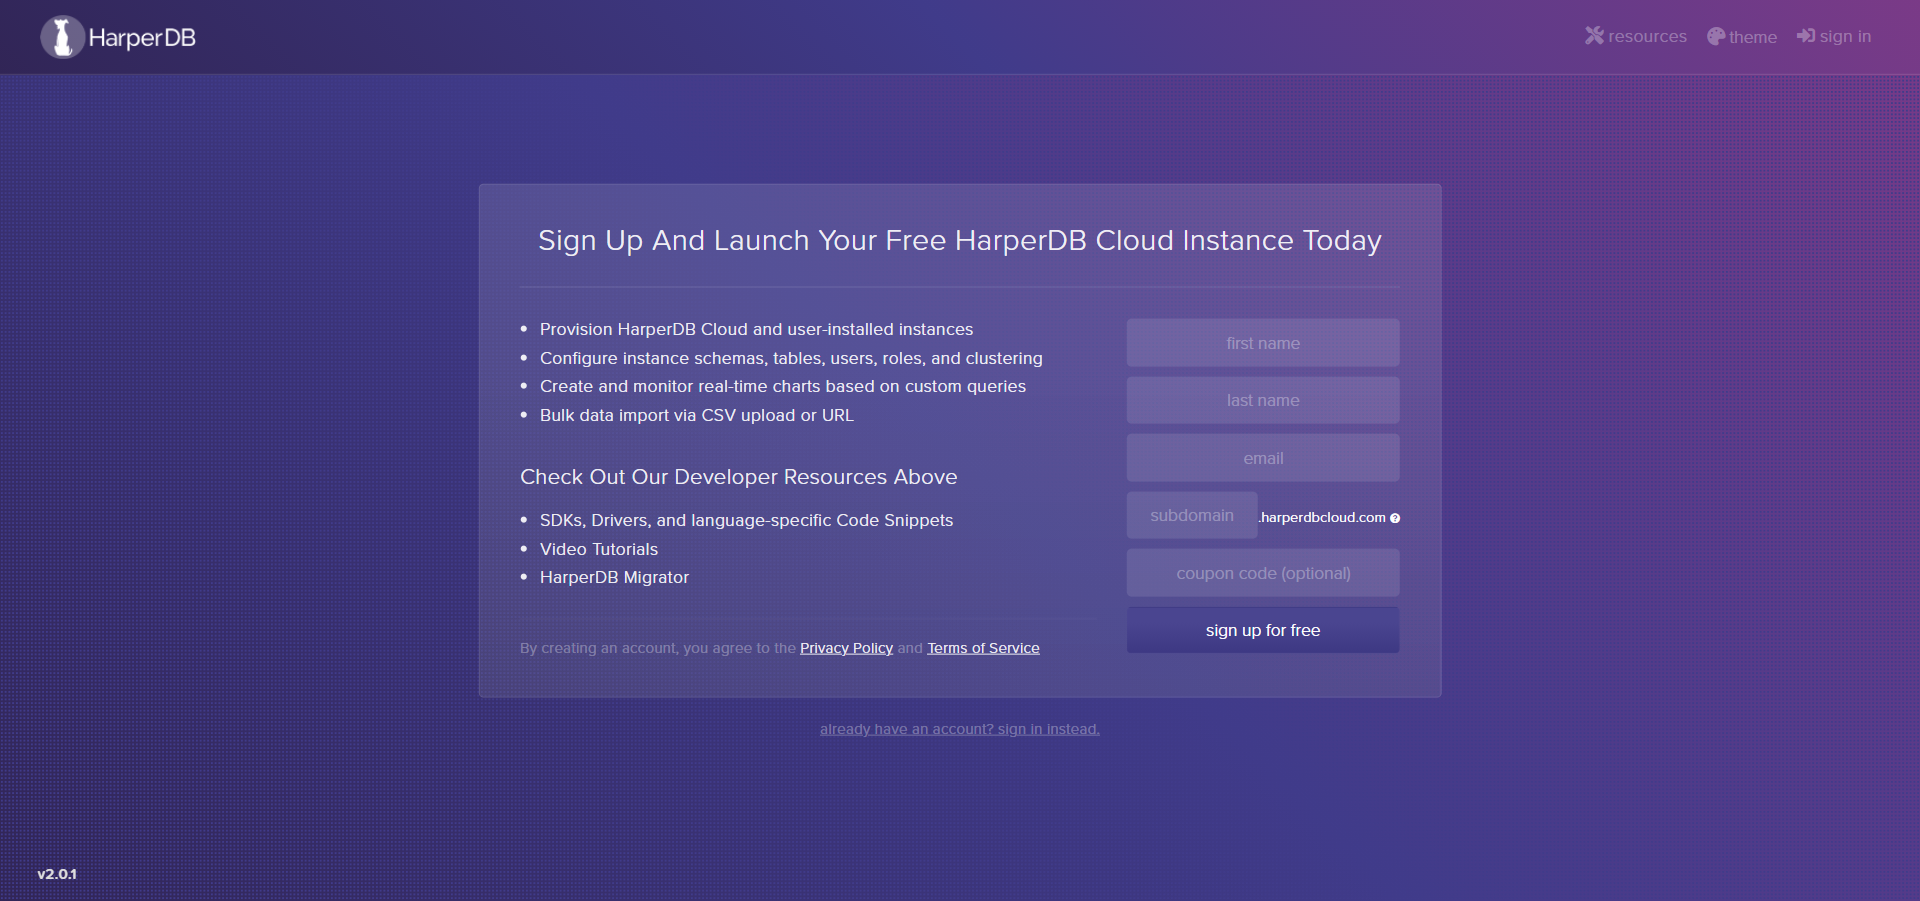
Click Sign Up For Free
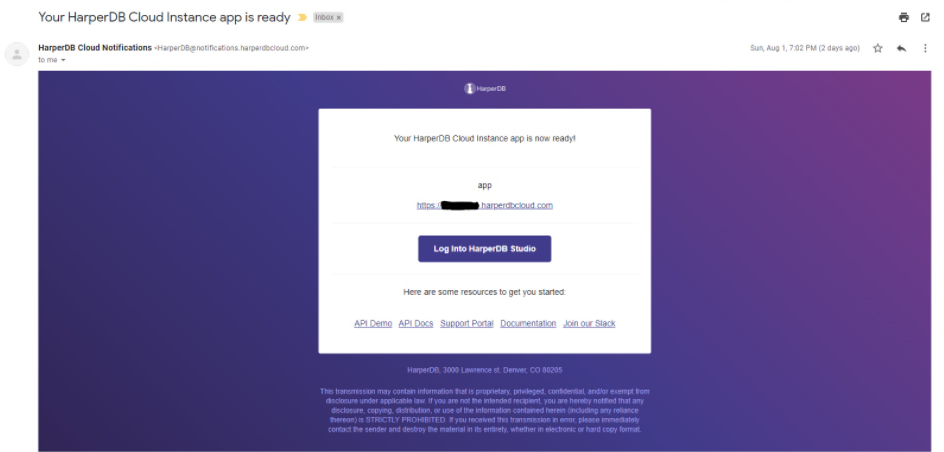
You will then receive an email that looks like this:
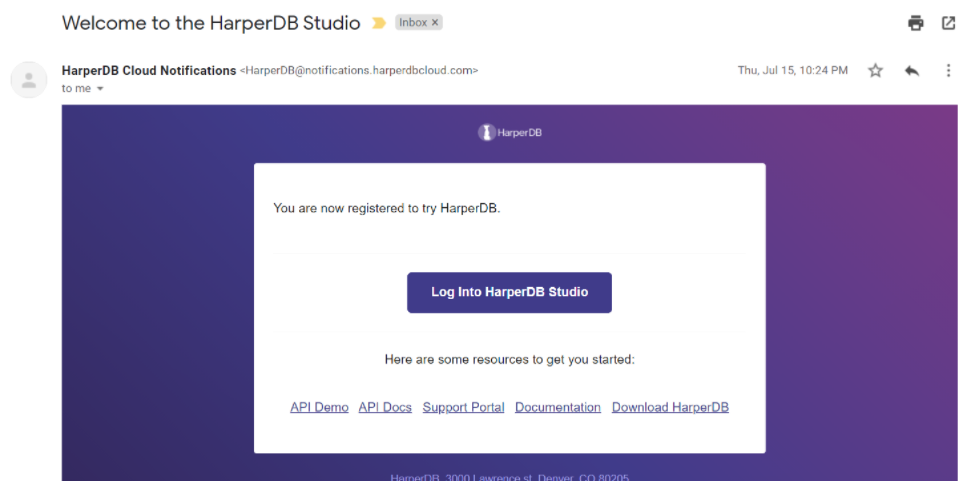
- Click on Log into HarperDB studio
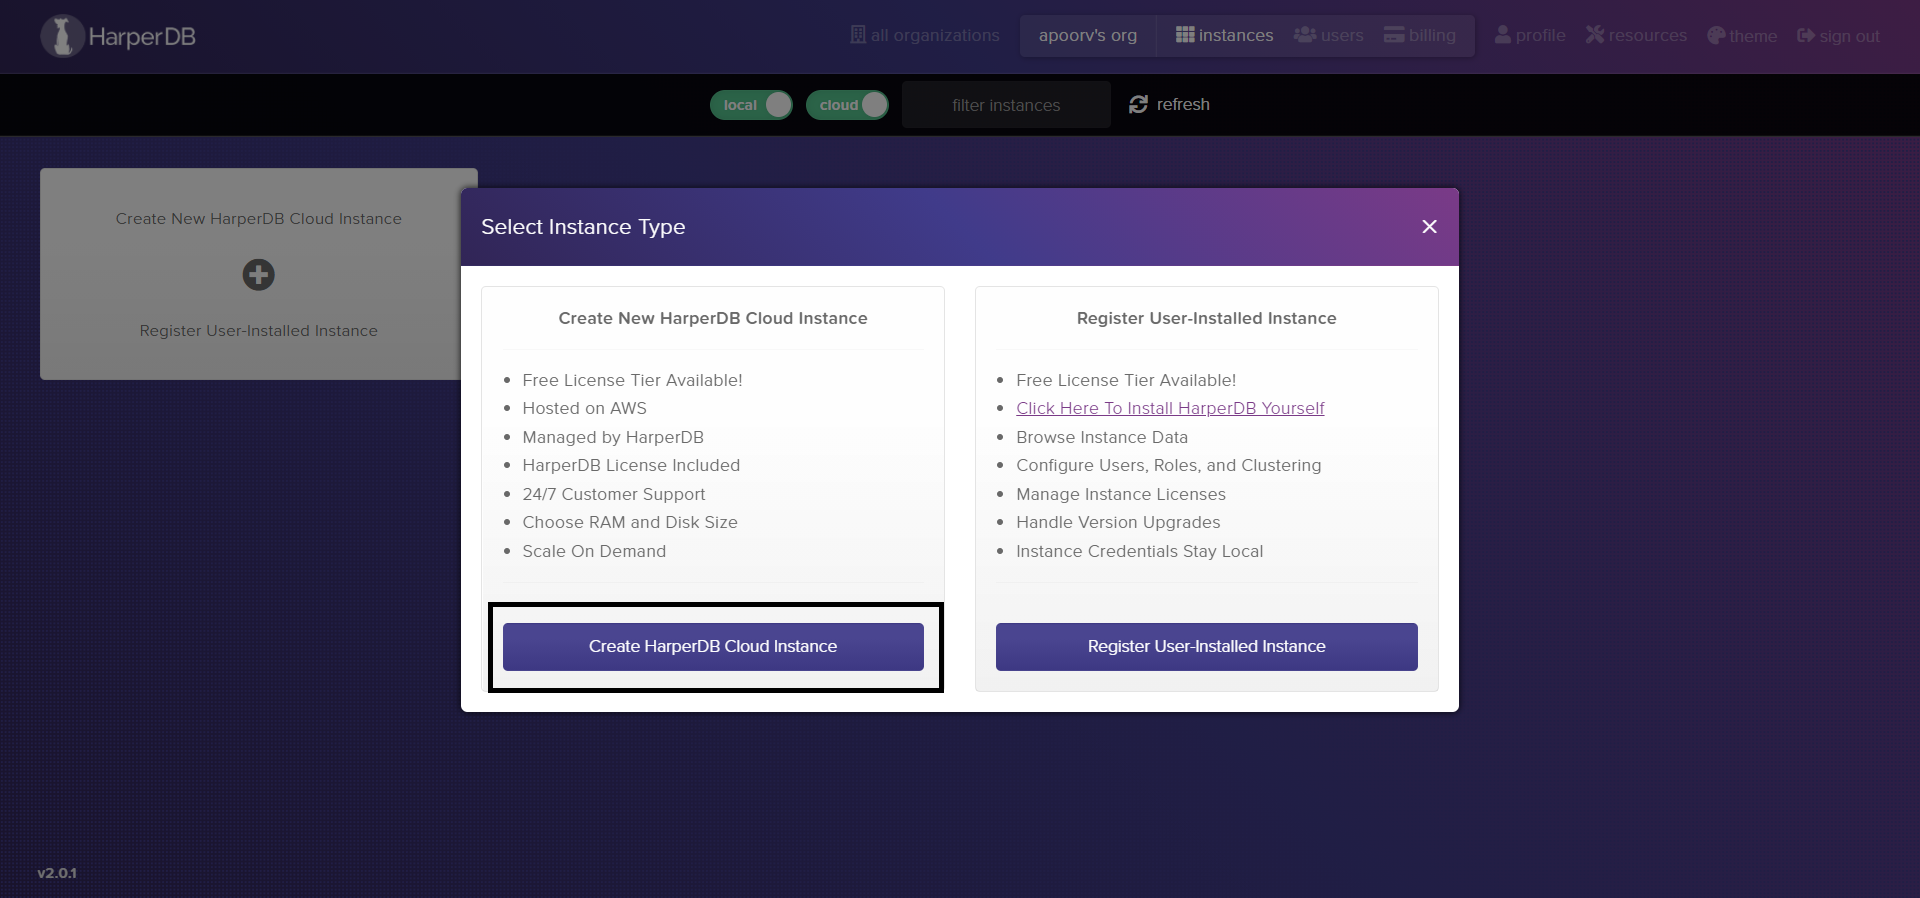
Creating an Instance
- Click on Create HarperDB Cloud Instance
- Enter Your Credentials
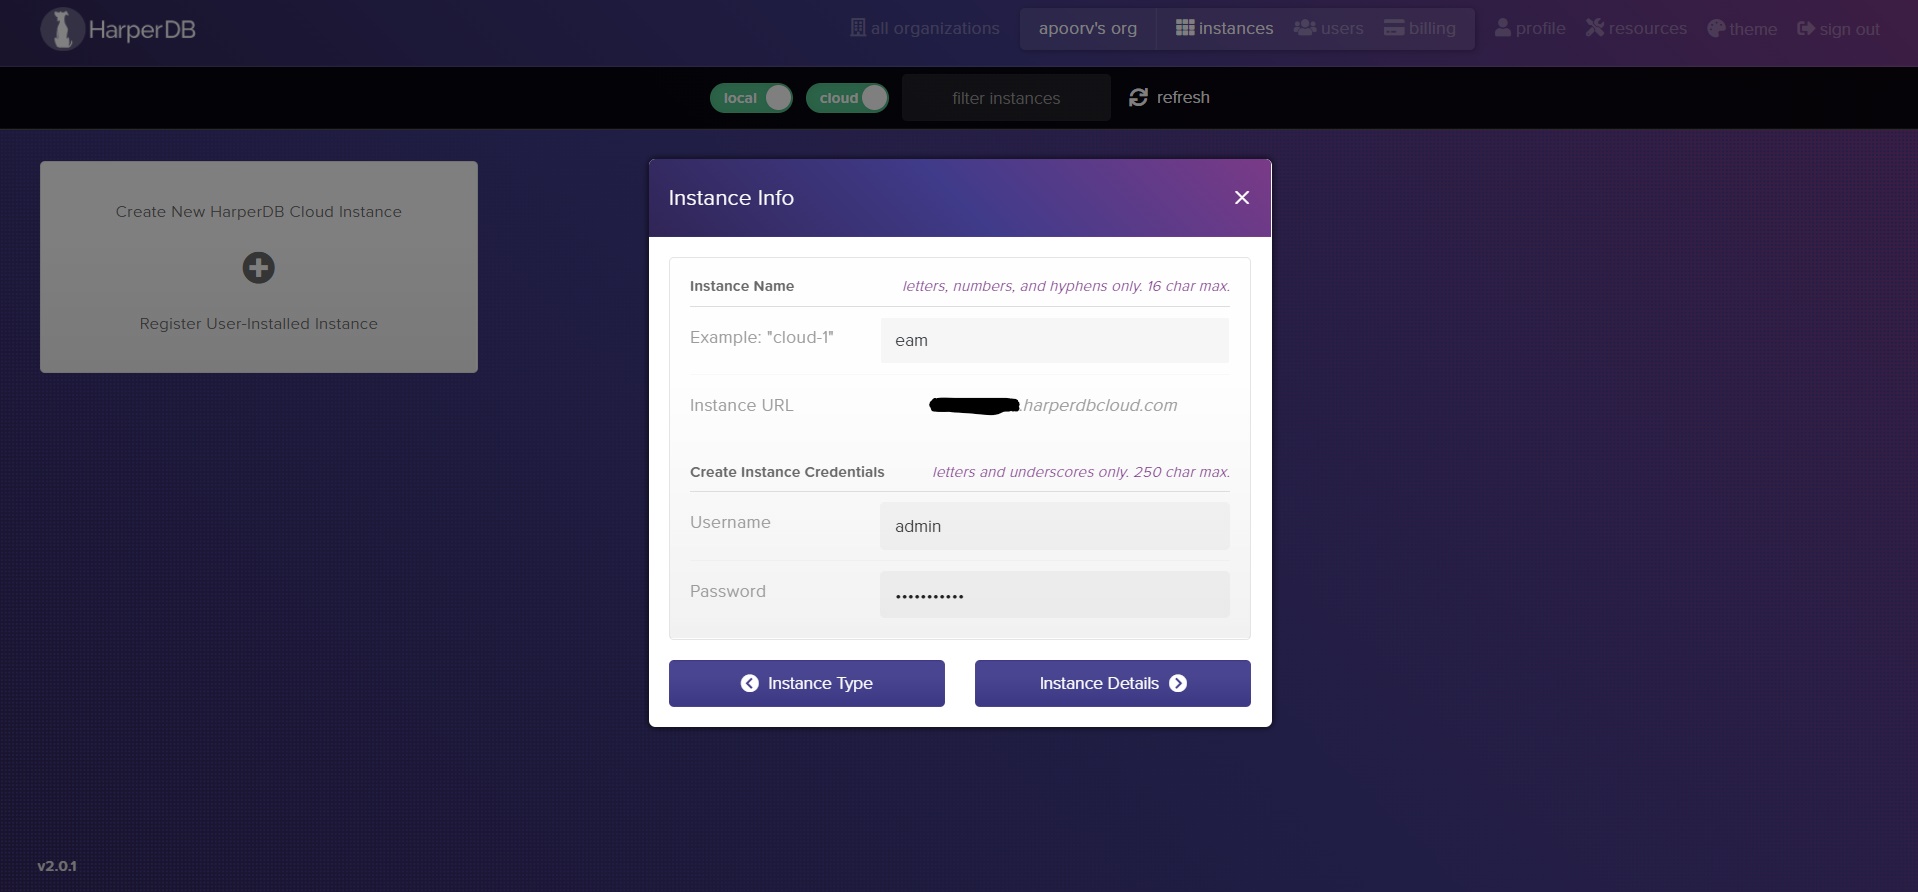
Note: These credentials should NOT be confused with your Studio account. This is for the superuser you are creating on this database instance. The username should NOT be in the form of an email.
- Pick your instance specs. You can start with a free version and upgrade later as per your need.
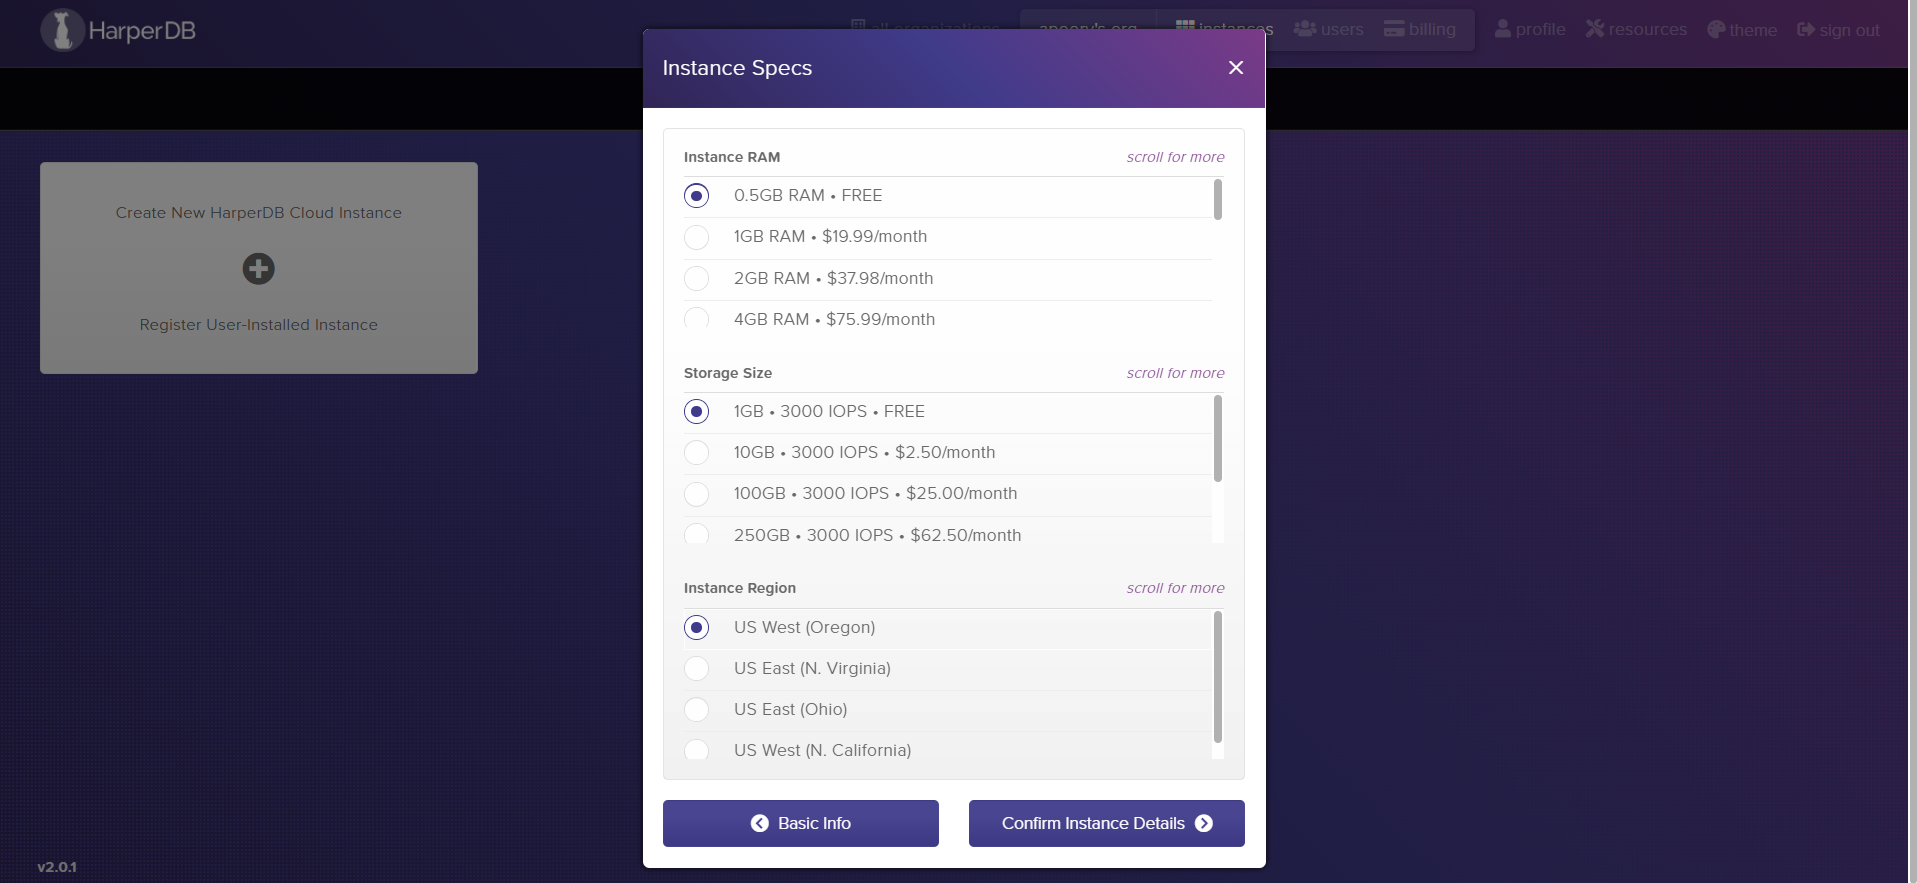
Next, review your details and click Confirm Instance Details
Finally, Click on Add Instance
In another 5 to 10 minutes your instance will be ready. You'll also receive an email as soon as it's done.
The instance URL that you receive is how you can access HarperDB with REST calls.
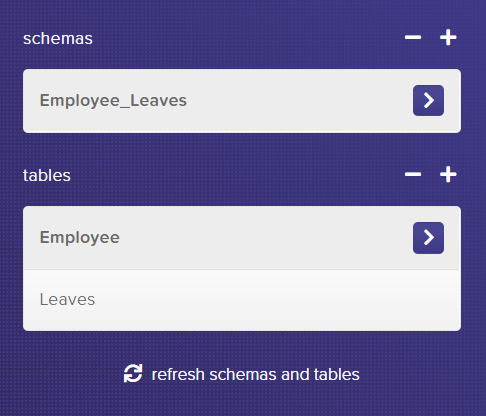
Initially, your instance does not have any schemas or tables. So you need to create them first.
I chose Employee_Leaves as the name for my schema. However, you can use any other name for your schema and then click on the green checkmark to save it.
Next, you need to create tables. For the moment, you'll set up two tables Employee and Leaves, the first one is for storing all the employee details like names and employee Ids and the second one is to store the leaves of employees in the company.
Note that you do not need to add all the columns just yet, they will be added automatically when needed. For now, while creating a table you just have to provide a hash_attribute name. The hash attribute is used to uniquely identify each record. For both these tables, you can use ID as hash_attribute.
Creating a Spring Boot App
To start with spring boot, you have to create a basic application from Spring.io.
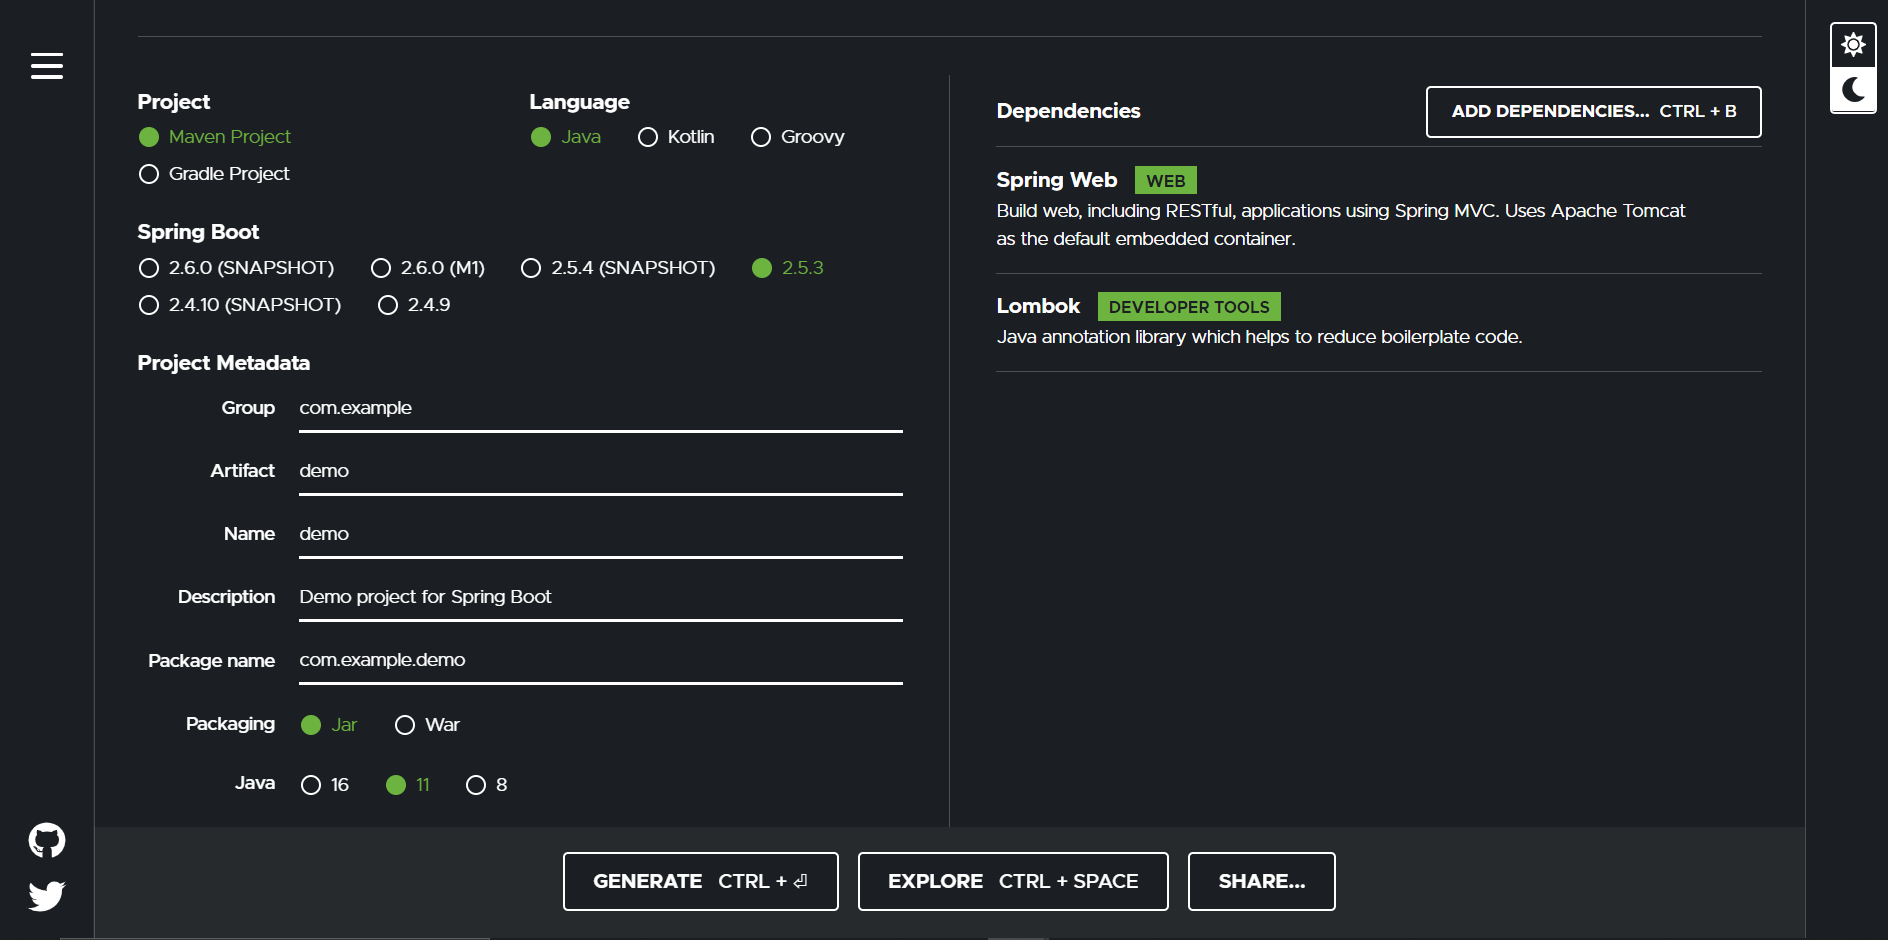
Select Maven project and Java language. For the Spring Boot version, select 2.5.3. You will also have to add the Spring-boot-starter-web and Lombok dependency.
Optionally, fill in the project metadata. For instance, you can set group as com.employee, artifact & name as attendance, package as com.employee.attendance, and finally enter a short description & click on Generate.
Extract the downloaded project and open it in your favorite IDE.
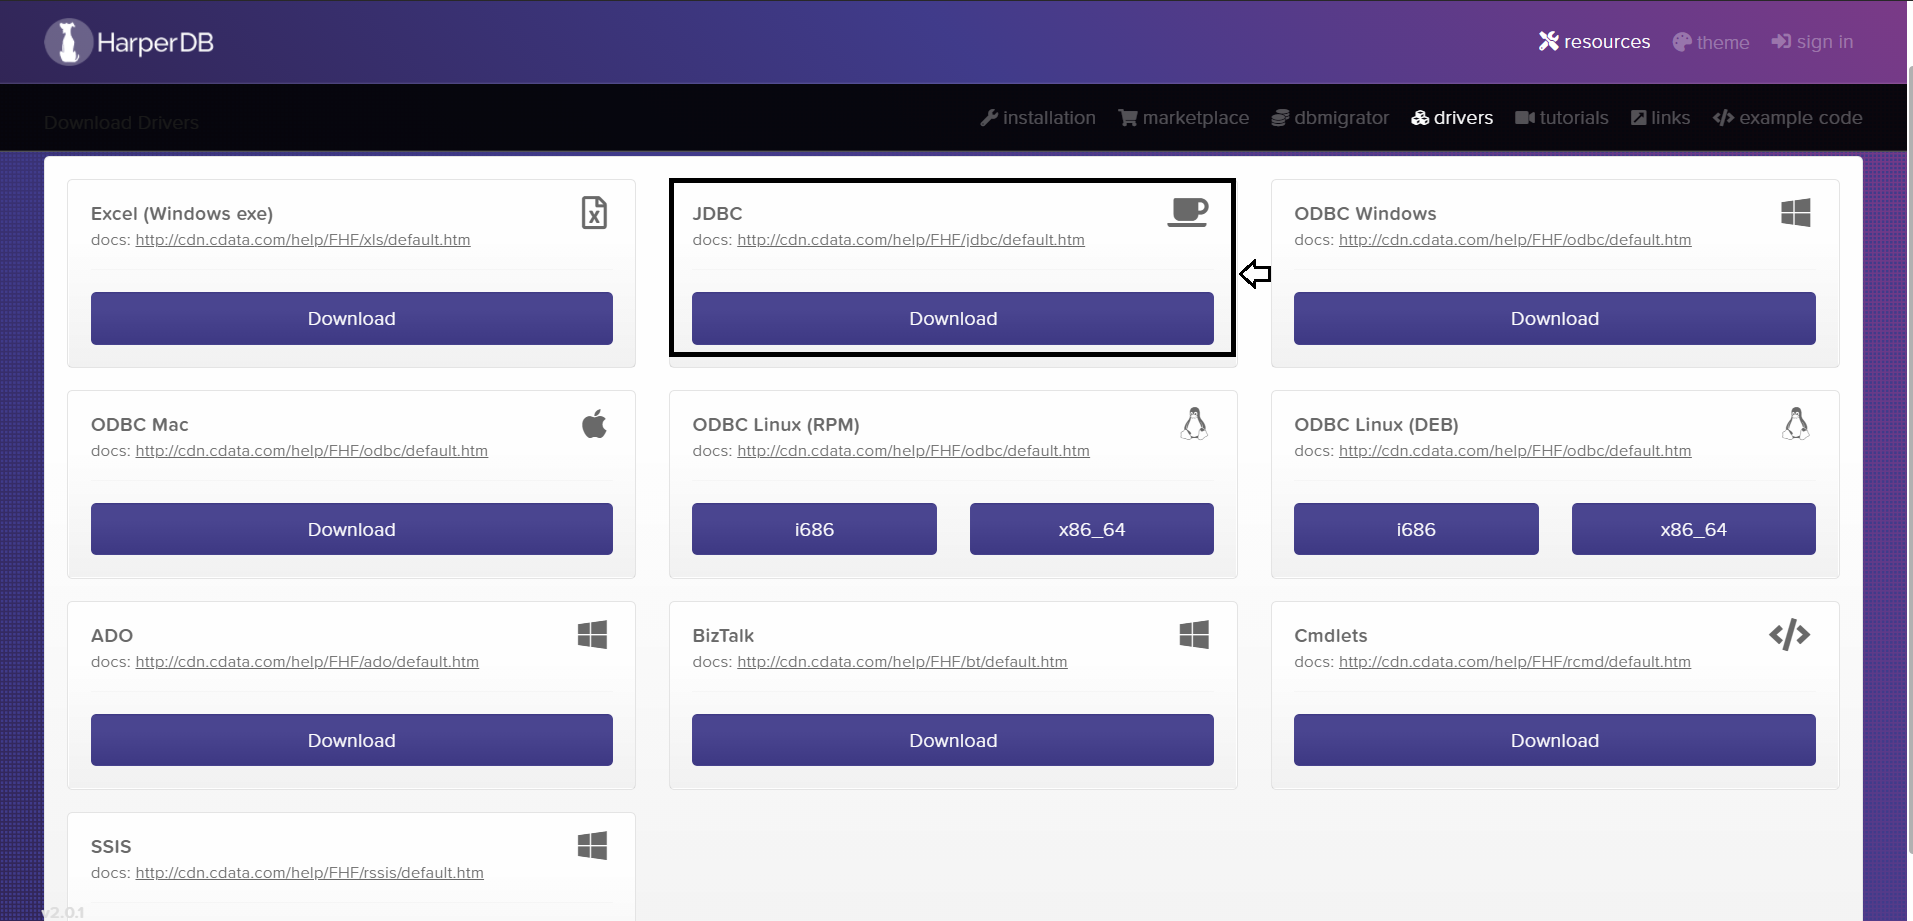
Next, for accessing the HarperDB instance from your Spring Boot app you first have to download the CData JDBC Driver for HarperDB.
The CData JDBC driver allows the most straightforward way to connect to HarperDB from any Java-based application. It wraps and hides the complexity of accessing data and provides additional powerful security features, smart caching, batching, socket management, and more.
Let's see the steps for integrate this driver inside your application:
- Navigate to - https://studio.harperdb.io/resources/drivers and then click on download.
Go back to your project root directory and create a new folder called
lib& extract the zip file contents inside this folder.Next, to import the external jar into your spring boot app, open the
pom.xmlfile and add the following dependency in it:
<dependency>
    <groupId>cdata.jdbc.harperdb</groupId>
    <artifactId>cdata.jdbc.harperdb</artifactId>
    <scope>system</scope>
    <version>1.0</version>
    <systemPath>${project.basedir}/lib/cdata.jdbc.harperdb.jar</systemPath>
</dependency>
Here, the ${project.basedir} refers to the path where your pom.xml is saved i.e your root directory. If you have the driver installed at any other path, you have to add its absolute path inside the <systemPath> Tag.
An important thing to note here is that you have to set the <scope> as system and also, inside the plugins set the <includeSystemScope> as true.
<plugin>
  <groupId>org.springframework.boot</groupId>
  <artifactId>spring-boot-maven-plugin</artifactId>
  <configuration>
    <includeSystemScope>true</includeSystemScope>
  </configuration>
</plugin>
This has to be done since you are ultimately going to deploy this application on a server(AWS) and for a server to know about any external JAR files, these configurations are necessary.
Now, to establish a connection between your app and the HarperDB instance, create a new package and name it service. Inside this, make a new Java file called ConnectionService.java and add the following content to it:
package com.employee.attendance.service;

import org.springframework.stereotype.Service;
import java.sql.Connection;
import java.sql.DriverManager;
import java.sql.SQLException;

@Service
public class ConnectionService {
    public Connection createConnection() throws SQLException {
        return DriverManager.getConnection("jdbc:harperdb:Server=https:xyz.harperdbcloud.com;User=admin;Password=1234;UseSSL=true;");
    }
}
@Service annotation is used with classes that provide some business functionalities
Here, you are making the connection with the Database using the "Connection String" inside the getConnection() method available under the DriverManager class.
Alternatively, you can also prepare the connection options using a Properties object. Pass the Properties object to the DriverManager:
Properties prop = new Properties();
prop.setProperty("Server","https:xyz.harperdbcloud.com");
prop.setProperty("User","admin");
prop.setProperty("Password","1234");

Connection conn = DriverManager.getConnection("jdbc:harperdb:",prop);
Replace the server, user, and password with your own credentials and you are good to go.
Designing REST APIs
Now that a connection has been successfully established between your app and HarperDB, let's begin with creating the Restful APIs.
First, create a new package called controller. Inside this, create a new class and name it AttendanceController.java.
A controller class is where you will expose all the endpoints of your microservices. These endpoints are what different microservices use to communicate with each other.
For this application, you will create 4 endpoints:
GET
/api/get/all/leaves/{employeeId}- To get all the leaves that a particular employee has applied so far.POST
/api/add/leave- To add a new leave for an employee.PUT
/api/edit/leave- To edit the date of an existing leave.DELETE
/api/cancel/leave- To delete an existing leave.
Here's how the complete controller class will look after adding these 4 endpoints:
package com.employee.attendance.controller;

import com.employee.attendance.dto.EmployeeDataDTO;
import com.employee.attendance.dto.EmployeeEditDataDTO;
import com.employee.attendance.service.AttendanceService;
import org.springframework.beans.factory.annotation.Autowired;
import org.springframework.web.bind.annotation.*;

import java.util.HashMap;
import java.util.List;

@RestController
public class AttendanceController {

    @Autowired
    private AttendanceService service;

    @GetMapping(value = "/api/get/all/leaves/{employeeId}")
    public List<HashMap<String, String>> getAllLeavesForEmployee(@PathVariable String employeeId) {
        return service.getAllLeavesForEmployee(employeeId);
    }

    @PostMapping(value = "/api/add/leave")
    public HashMap<String, String> addNewLeave(@RequestBody EmployeeDataDTO employeeData) {
        return service.addNewLeaveForEmployee(employeeData);
    }

    @PutMapping(value = "/api/edit/leave")
    public HashMap<String, String> editLeave(@RequestBody EmployeeEditDataDTO employeeEditData) {
        return service.editLeaveForEmployee(employeeEditData);
    }

    @DeleteMapping(value = "/api/cancel/leave")
    public HashMap<String, String> cancelLeave(@RequestBody EmployeeDataDTO employeeData) {
        return service.cancelLeaveForEmployee(employeeData);
    }
}
Let us now create another class called AttendanceService.java in the service package that you created earlier. Inside this class, you will write all your business logic. So, let's implement all 4 methods which are mentioned in your controller:
package com.employee.attendance.service;

import com.employee.attendance.dto.EmployeeDataDTO;
import com.employee.attendance.dto.EmployeeEditDataDTO;
import lombok.extern.slf4j.Slf4j;
import org.springframework.beans.factory.annotation.Autowired;
import org.springframework.stereotype.Service;
import java.sql.*;
import java.util.ArrayList;
import java.util.HashMap;
import java.util.List;

@Service
@Slf4j
public class AttendanceService {

    @Autowired
    private ConnectionService connectionService;

    public List<HashMap<String, String>> getAllLeavesForEmployee(String empId) {
        log.info("Getting all leaves for employee - {}",empId);
        List<HashMap<String, String>> resultList = new ArrayList<>();
        try {
            Connection conn = connectionService.createConnection();
            PreparedStatement statement = conn.prepareStatement("Select * From Employee_Leaves.Leaves where empId = ?");
            statement.setString(1,empId);
            ResultSet resultSet = statement.executeQuery();
            while (resultSet.next()) {
                HashMap<String, String> result = new HashMap<>();
                result.put("date_of_apply",new Date(Long.parseLong(resultSet.getString("__createdtime__"))).toString());
                result.put("last_update_date",new Date(Long.parseLong(resultSet.getString("__updatedtime__"))).toString());
                result.put("leave_applied_for",resultSet.getString("date"));
                result.put("employee_id",resultSet.getString("empId"));
                resultList.add(result);
            }
            conn.close();
        } catch (Exception e){
            log.error("Error occurred", e);
            HashMap<String, String> result = new HashMap<>();
            result.put("Error",e.getMessage());
            resultList.add(result);
        }
        return resultList;
    }

    public HashMap<String, String> addNewLeaveForEmployee(EmployeeDataDTO employeeData) {
        log.info("Inserting new leave for employee - {}",employeeData.getEmployeeId());
        HashMap<String, String> result = new HashMap<>();
        try {
            Connection conn = connectionService.createConnection();
            PreparedStatement statement = conn.prepareStatement("INSERT INTO Employee_Leaves.Leaves (date, empId) VALUES (?,?)");
            statement.setString(1, employeeData.getDate());
            statement.setString(2, employeeData.getEmployeeId());
            int count = statement.executeUpdate();
            if(count>0) {
                result.put("Message", "Success");
                result.put("Affected rows", String.valueOf(count));
            }
            conn.close();
        } catch (Exception e){
            log.error("Error occurred", e);
            result.put("Error",e.getMessage());
        }
        return result;
    }

    public HashMap<String, String> editLeaveForEmployee(EmployeeEditDataDTO employeeEditData) {
        log.info("Updating leave for employee - {}",employeeEditData.getEmployeeId());
        HashMap<String, String> result = new HashMap<>();
        try {
            Connection conn = connectionService.createConnection();
            PreparedStatement statement = conn.prepareStatement("UPDATE Employee_Leaves.Leaves SET date = ? WHERE empId=? and date = ?");
            statement.setString(1, employeeEditData.getNewDate());
            statement.setString(2, employeeEditData.getEmployeeId());
            statement.setString(3, employeeEditData.getPreviousDate());
            int count = statement.executeUpdate();
            if(count>0) {
                result.put("Message", "Success");
                result.put("Affected rows", String.valueOf(count));
            }
            conn.close();
        } catch (Exception e){
            log.error("Error occurred", e);
            result.put("Error",e.getMessage());
        }
        return result;
    }

    public HashMap<String, String> cancelLeaveForEmployee(EmployeeDataDTO employeeData) {
        log.info("Cancelling leave for employee - {}",employeeData.getEmployeeId());
        HashMap<String, String> result = new HashMap<>();
        try {
            Connection conn = connectionService.createConnection();
            PreparedStatement statement = conn.prepareStatement("DELETE FROM Employee_Leaves.Leaves WHERE empId = ? and date = ?");
            statement.setString(1, employeeData.getEmployeeId());
            statement.setString(2, employeeData.getDate());
            int count = statement.executeUpdate();
            if(count>0) {
                result.put("Message", "Success");
                result.put("Affected rows", String.valueOf(count));
            }
            conn.close();
        } catch (Exception e){
            log.error("Error occurred", e);
            result.put("Error",e.getMessage());
        }
        return result;
    }
}
With that done, let's understand what each of these four functions is used for:
getAllLeavesForEmployee().
It will be responsible for fetching all the leaves for a particular employee from the Leaves table. You are simply establishing a connection and then querying the Leaves table based on employee Id.
addNewLeaveForEmployee()
Whenever an employee needs to apply for a leave, this function will be invoked which will take an Object of EmployeeDataDTO class and will be adding a new leave inside the Leave table of your database.
editLeaveForEmployee()
If in case an employee wants to change the date for which leave has been applied before, the editLeaveForEmployee() function will be responsible for modifying that in your Database.
cancelLeaveForEmployee()
It will simply cancel a particular leave for an employee i.e. Delete the row from the table. This function also takes the object of the EmployeeDataDTO class as its parameters.
Next thing is to understand the use of EmployeeDataDTO and EmployeeEditDataDTO classes.
These two classes will act as your Data Transfer Objects or simply DTOs. They will store the data which you will pass in the API request body & carry that to the service for processing via the controller class.
To generate these Java files, create a new package called dto and add two files in it, one will be EmployeeDataDTO.java and another one will be EmployeeEditDataDTO.java.
Here's the content EmployeeDataDTO.java will hold:
- Employee Id
- Date for which leave is being applied
package com.employee.attendance.dto;

import lombok.Data;

@Data
public class EmployeeDataDTO {
    private String employeeId;
    private String date;
}
And EmployeeEditDataDTO.java will have the following properties:
- Employee Id
- Previous Date which user wants to edit
- New Date for Leave
package com.employee.attendance.dto;

import lombok.Data;

@Data
public class EmployeeEditDataDTO {
    private String employeeId;
    private String previousDate;
    private String newDate;
}
@Datais a useful annotation that bundles the features of@ToString,@EqualsAndHashCode,@Getter/@Setter. It is available under Lombok dependency.
Testing the Endpoints
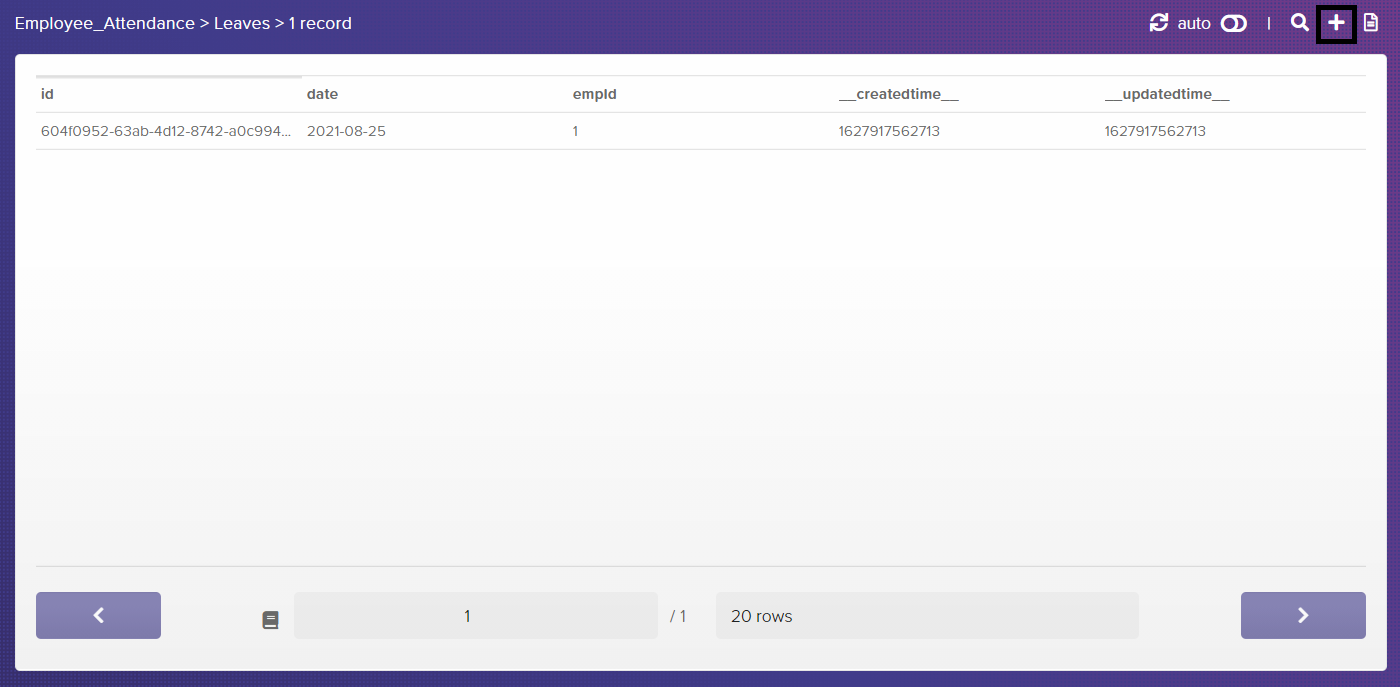
I have manually inserted some initial data into the database tables (by clicking the '+' sign on the top right of the table) for testing purposes:
- Table Employee
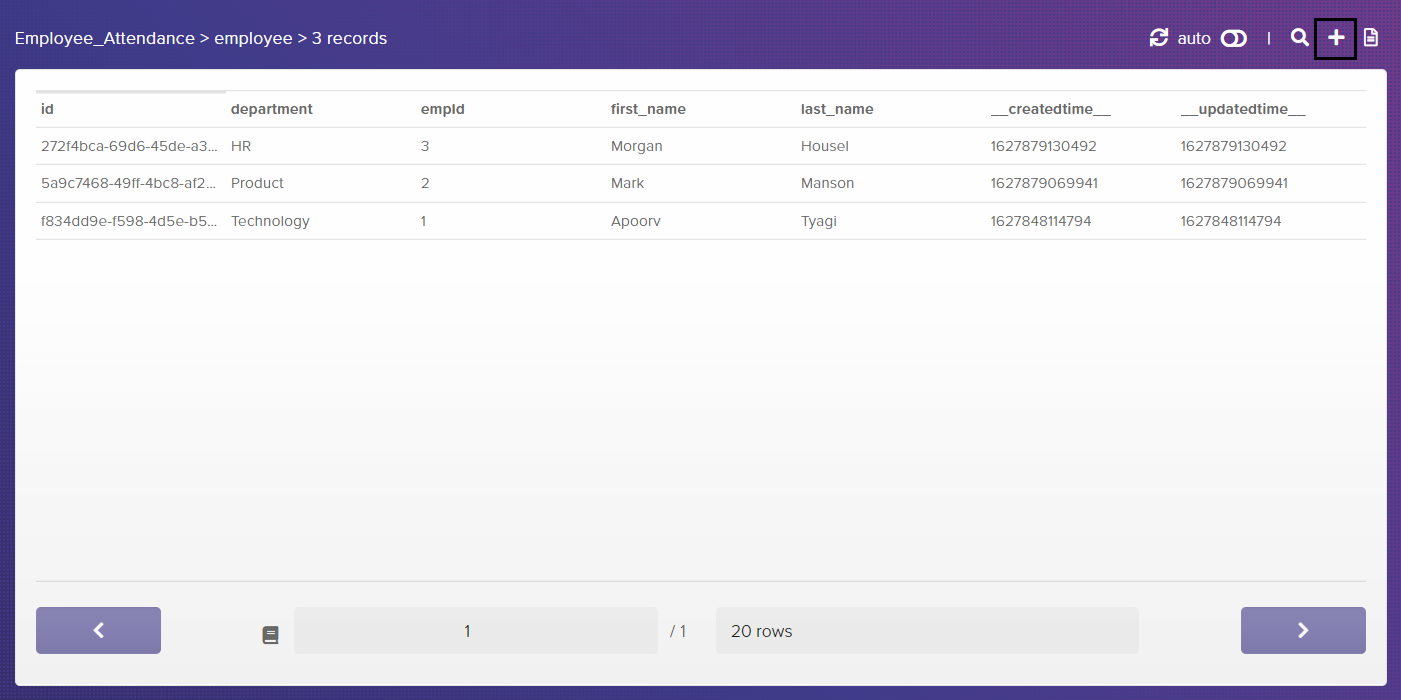
- Table Leave
Now you have to hit those 4 API endpoints to check if everything is working as expected.
For this, you must download the Postman app in your local development environment from their official downloads.
After downloading and successfully installing it, open the app and run your Spring Boot application.
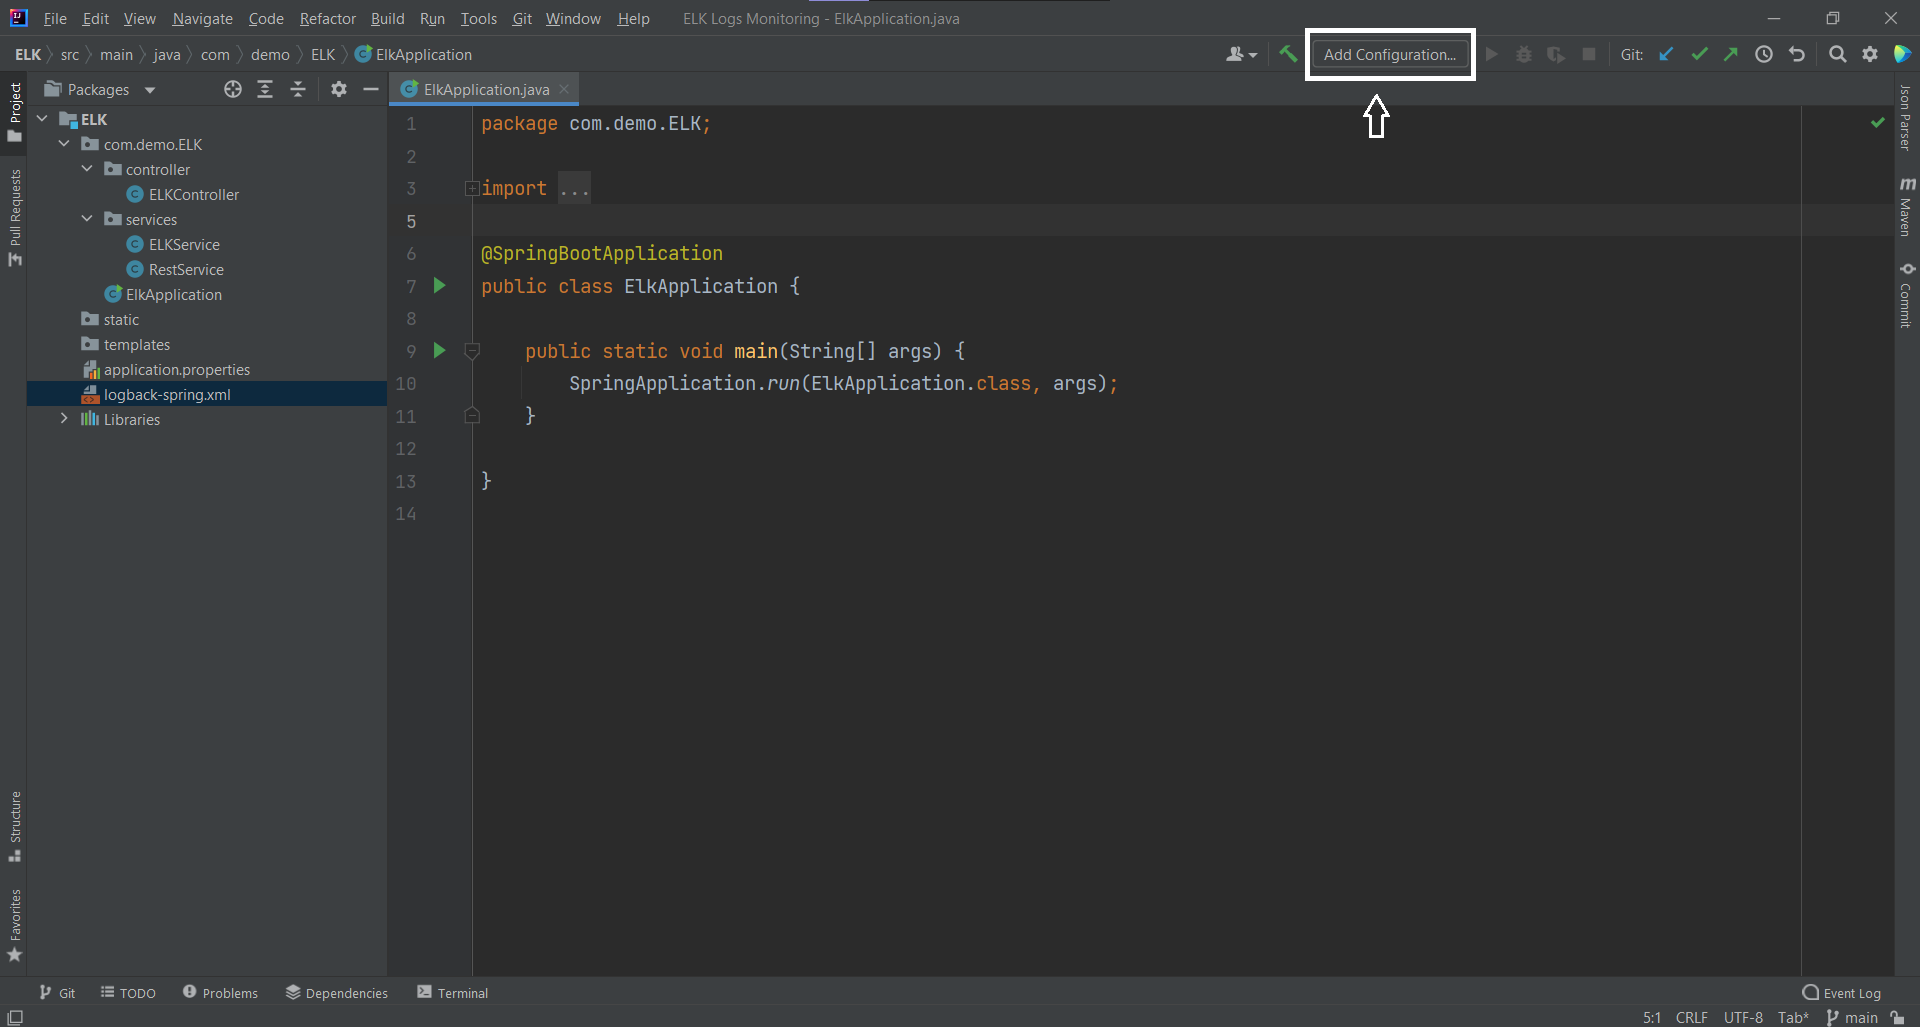
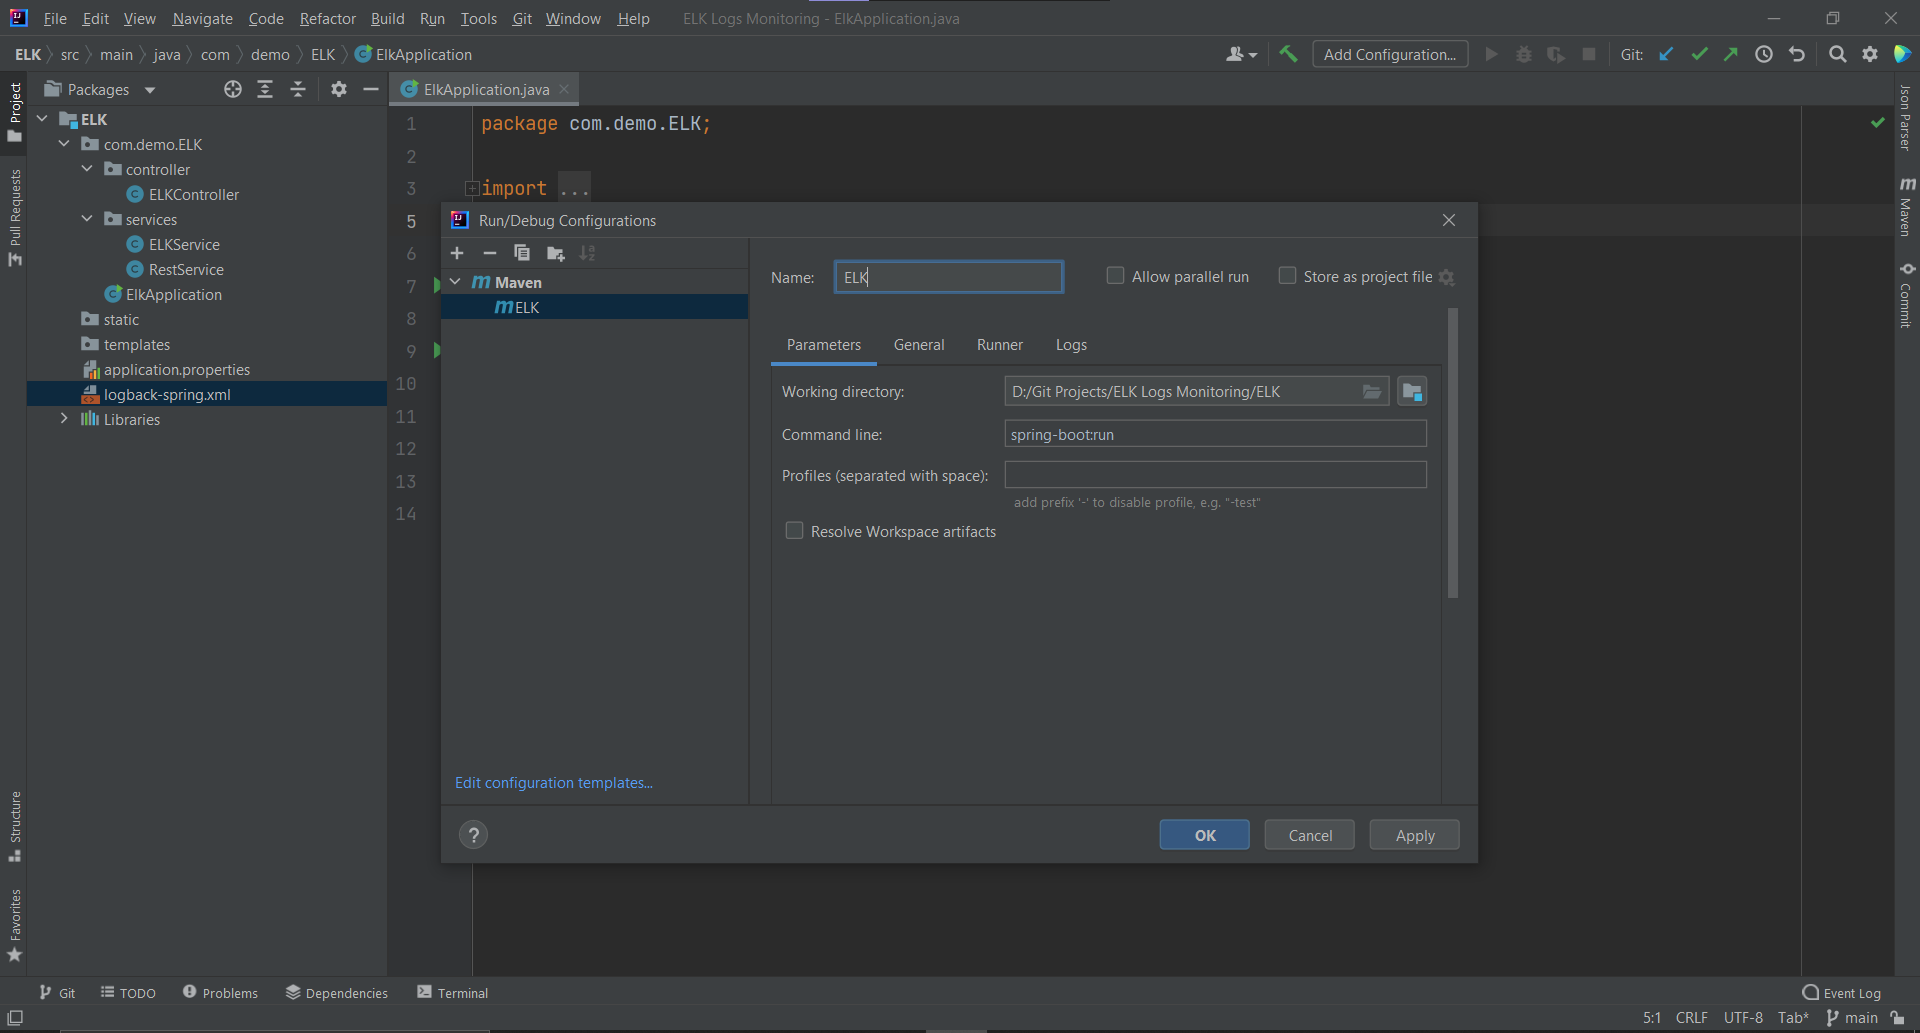
In case you are using an IDE like IntelliJ IDEA, you can run the Spring Boot application by following these instructions:
- Click on
Add Configurationfrom the top menu bar.
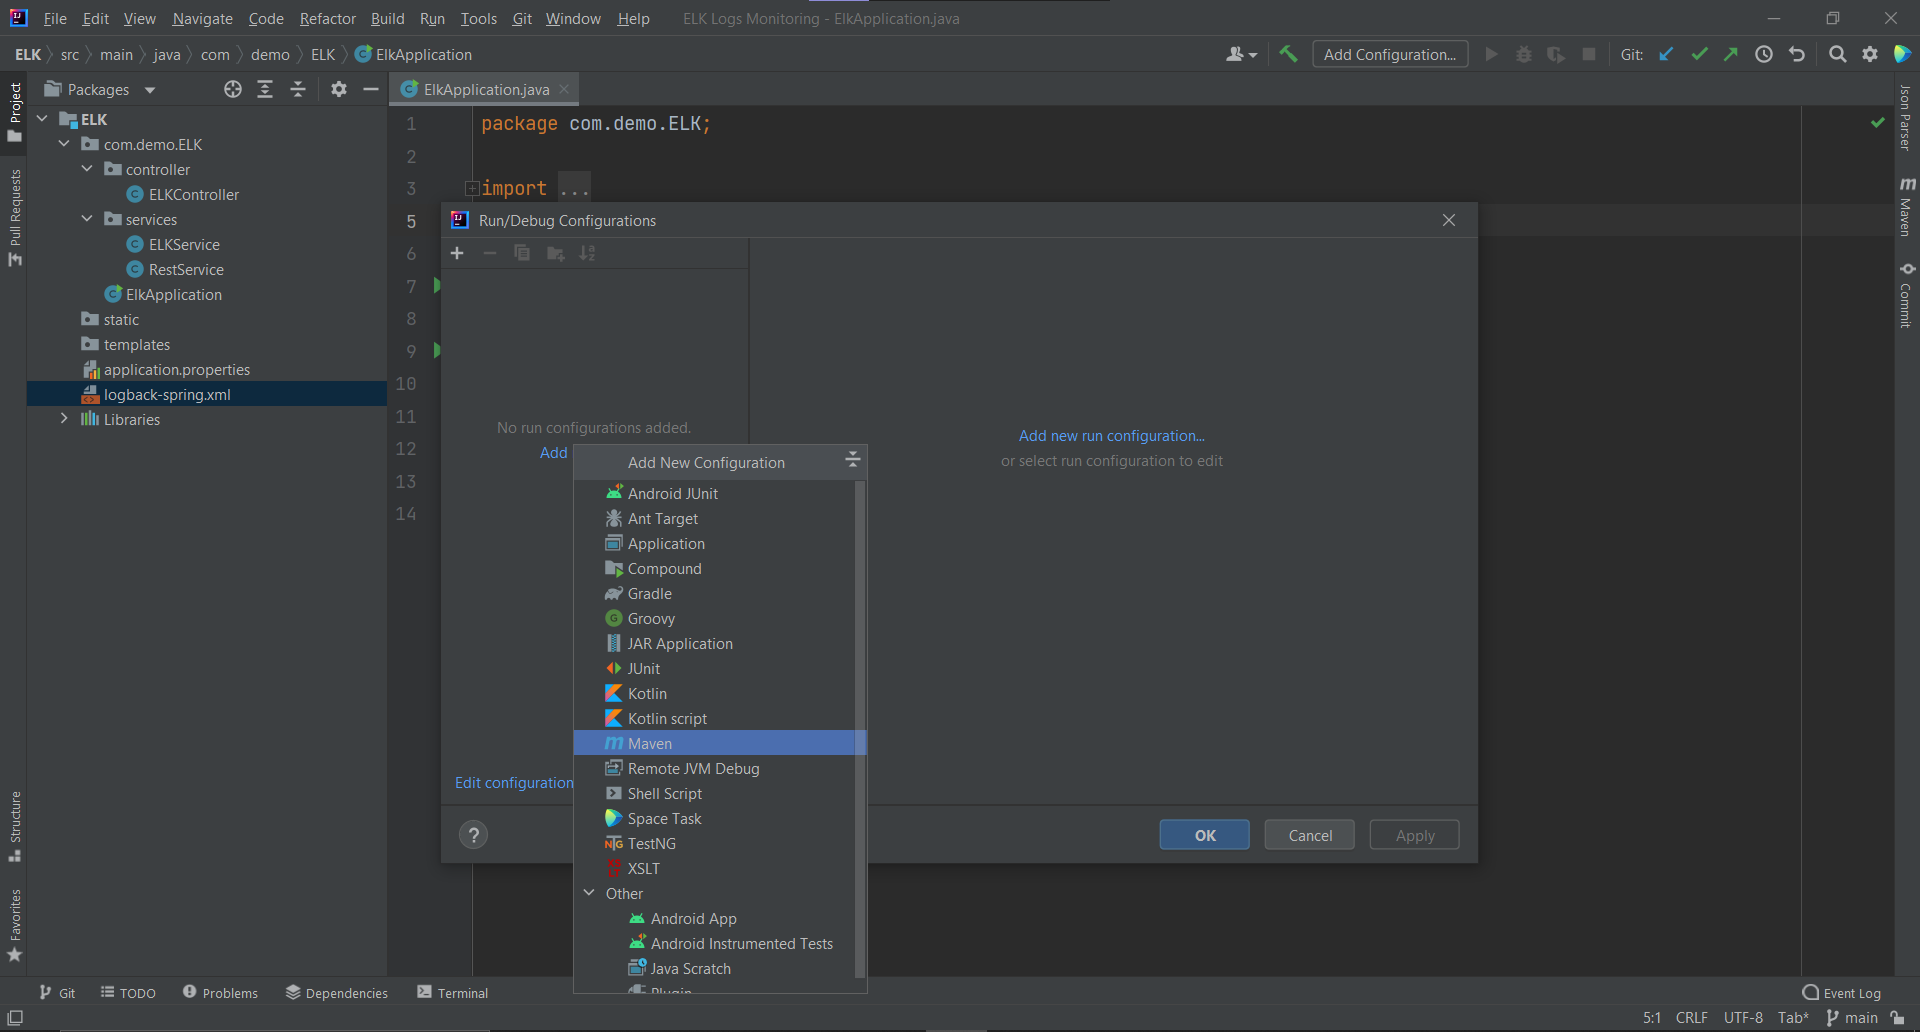
- A new dialog box will open, click on
Add new run configurationsand selectMavenfrom the dropdown.
- Give your run configuration a name. The working directory will automatically get picked. You just have to put the command
spring-boot:runinside the command line and then click Apply and OK and finally run the app.
The next thing you have to do is to hit the endpoints via the Postman app:
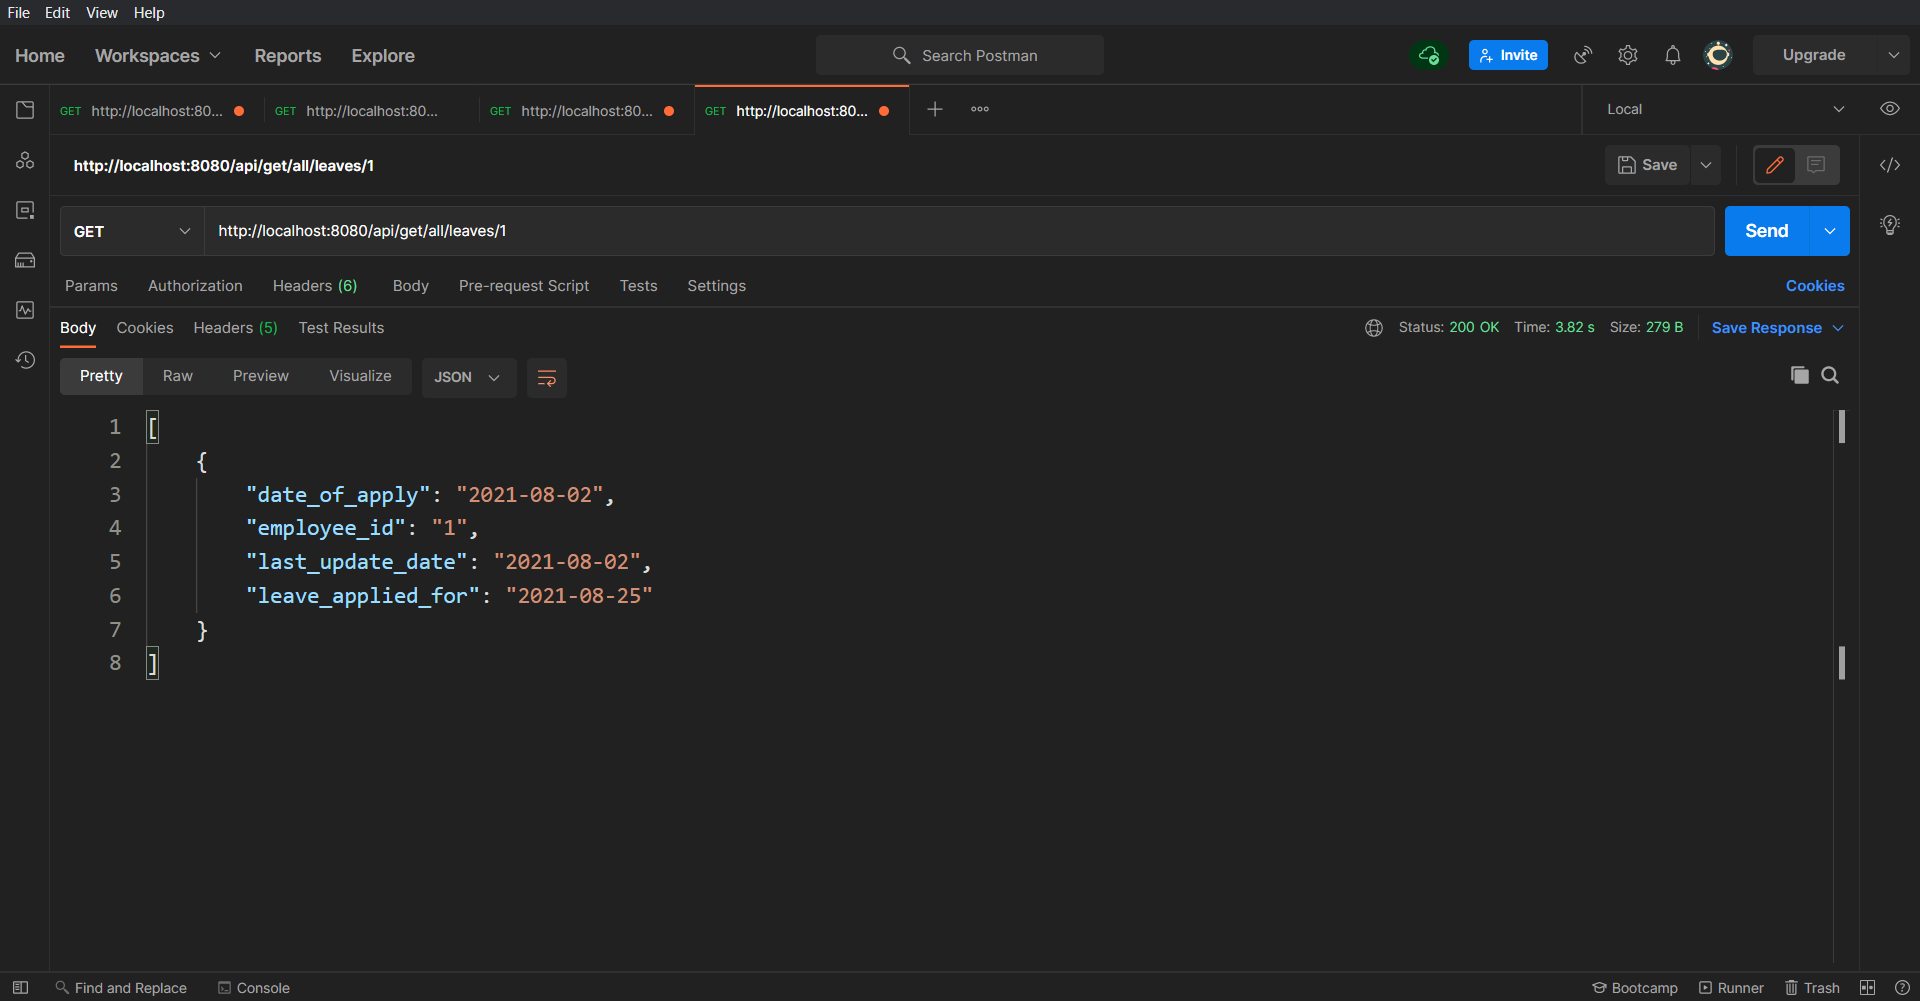
/api/get/all/leaves/{employeeId}
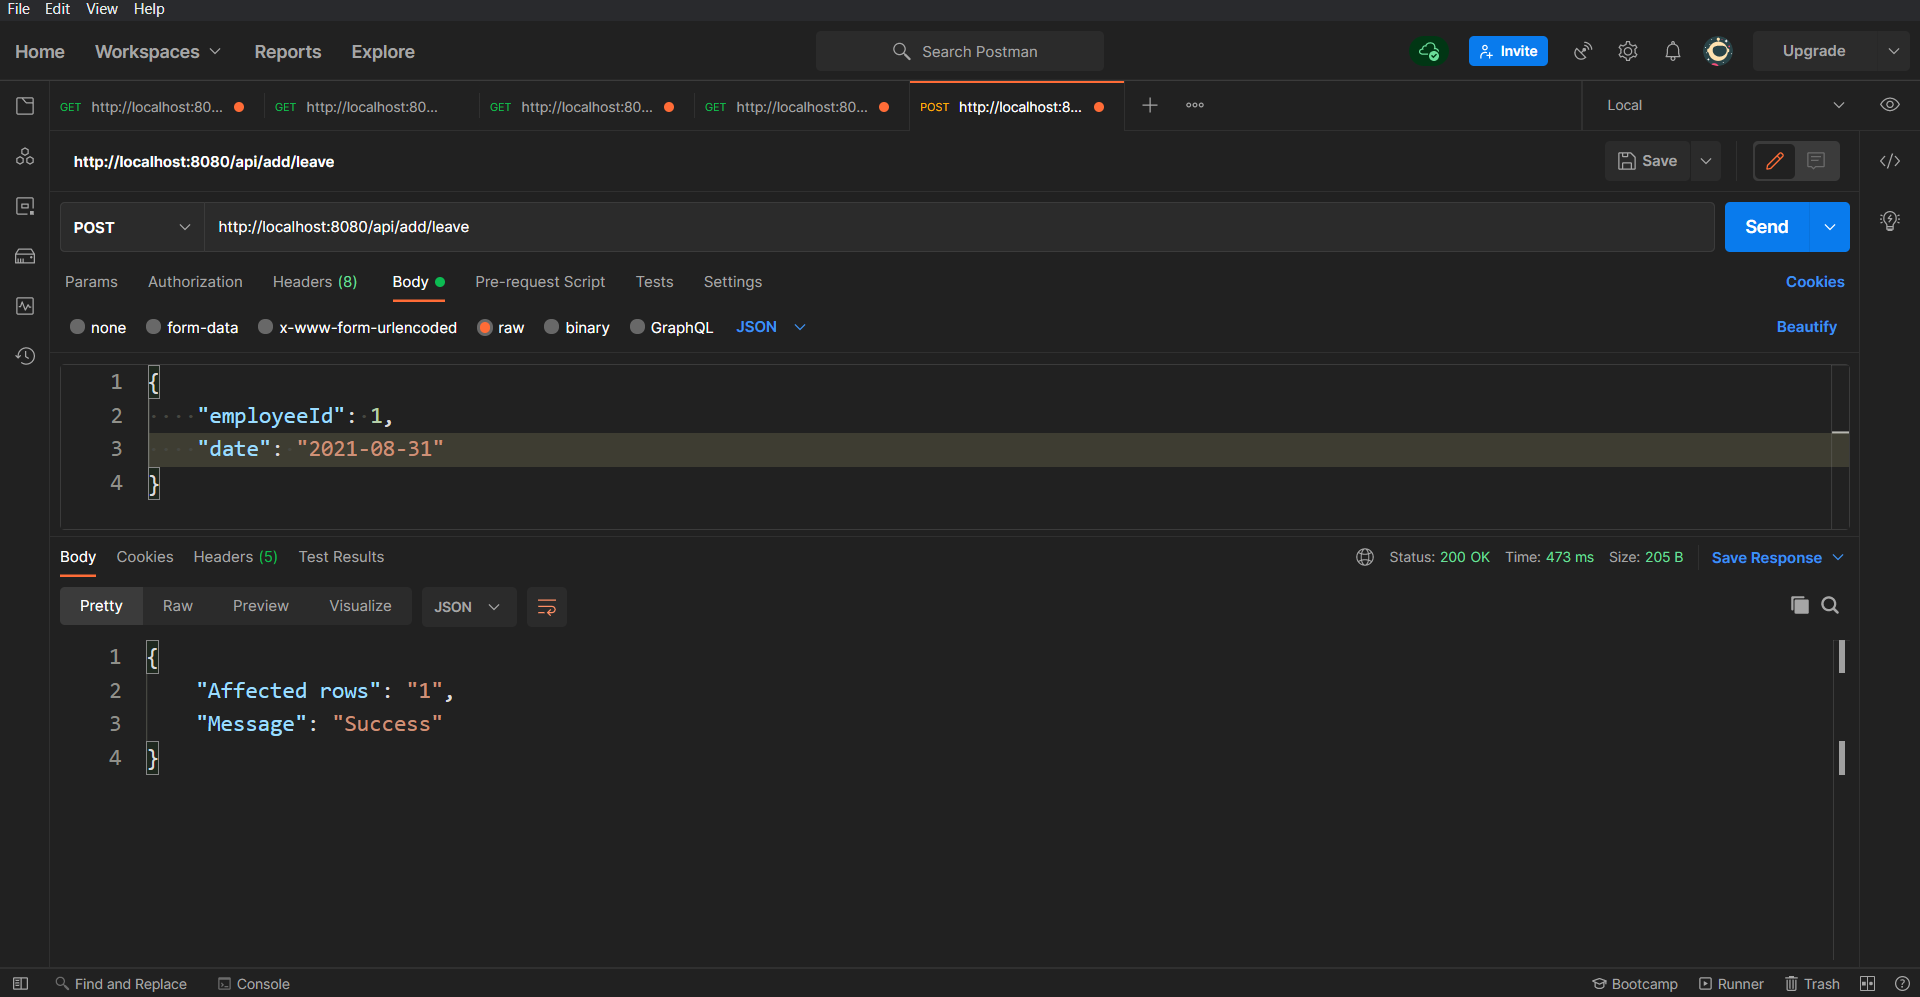
/api/add/leave
To check if the leave got added successfully or not, let's call the api/get/all/leaves API again which you used in the first step:
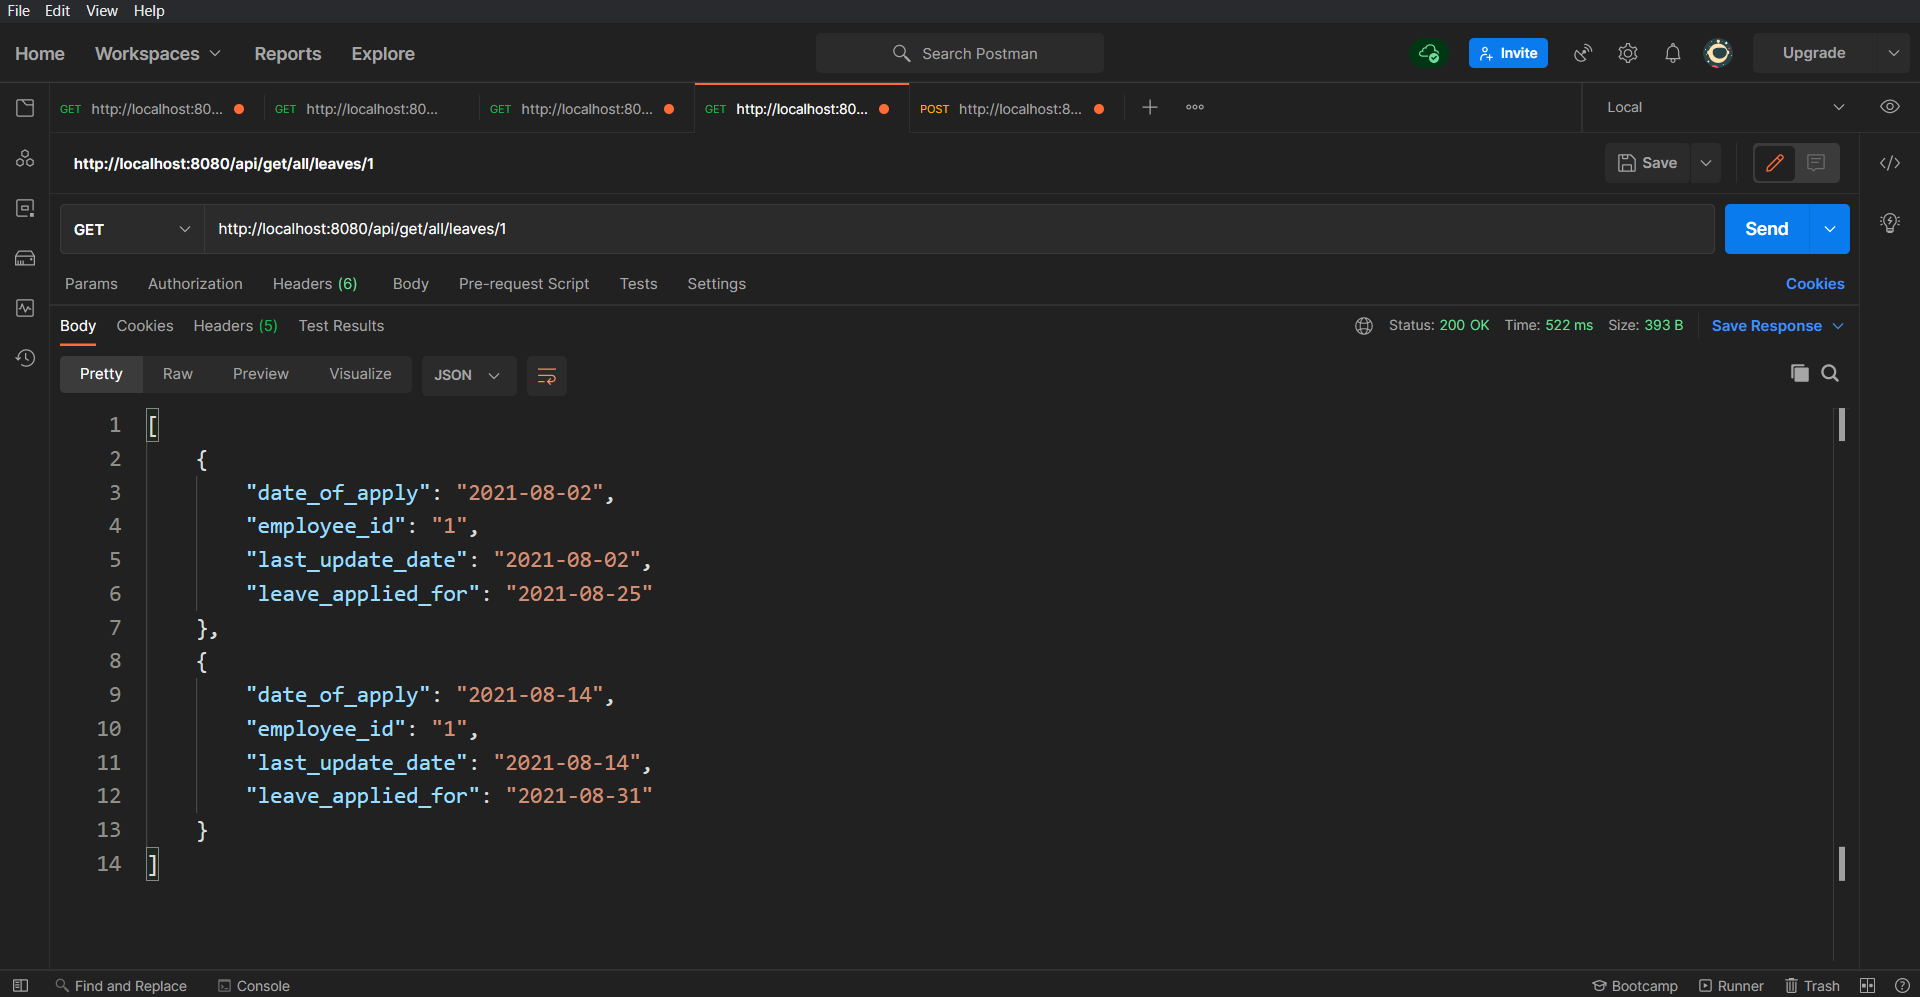
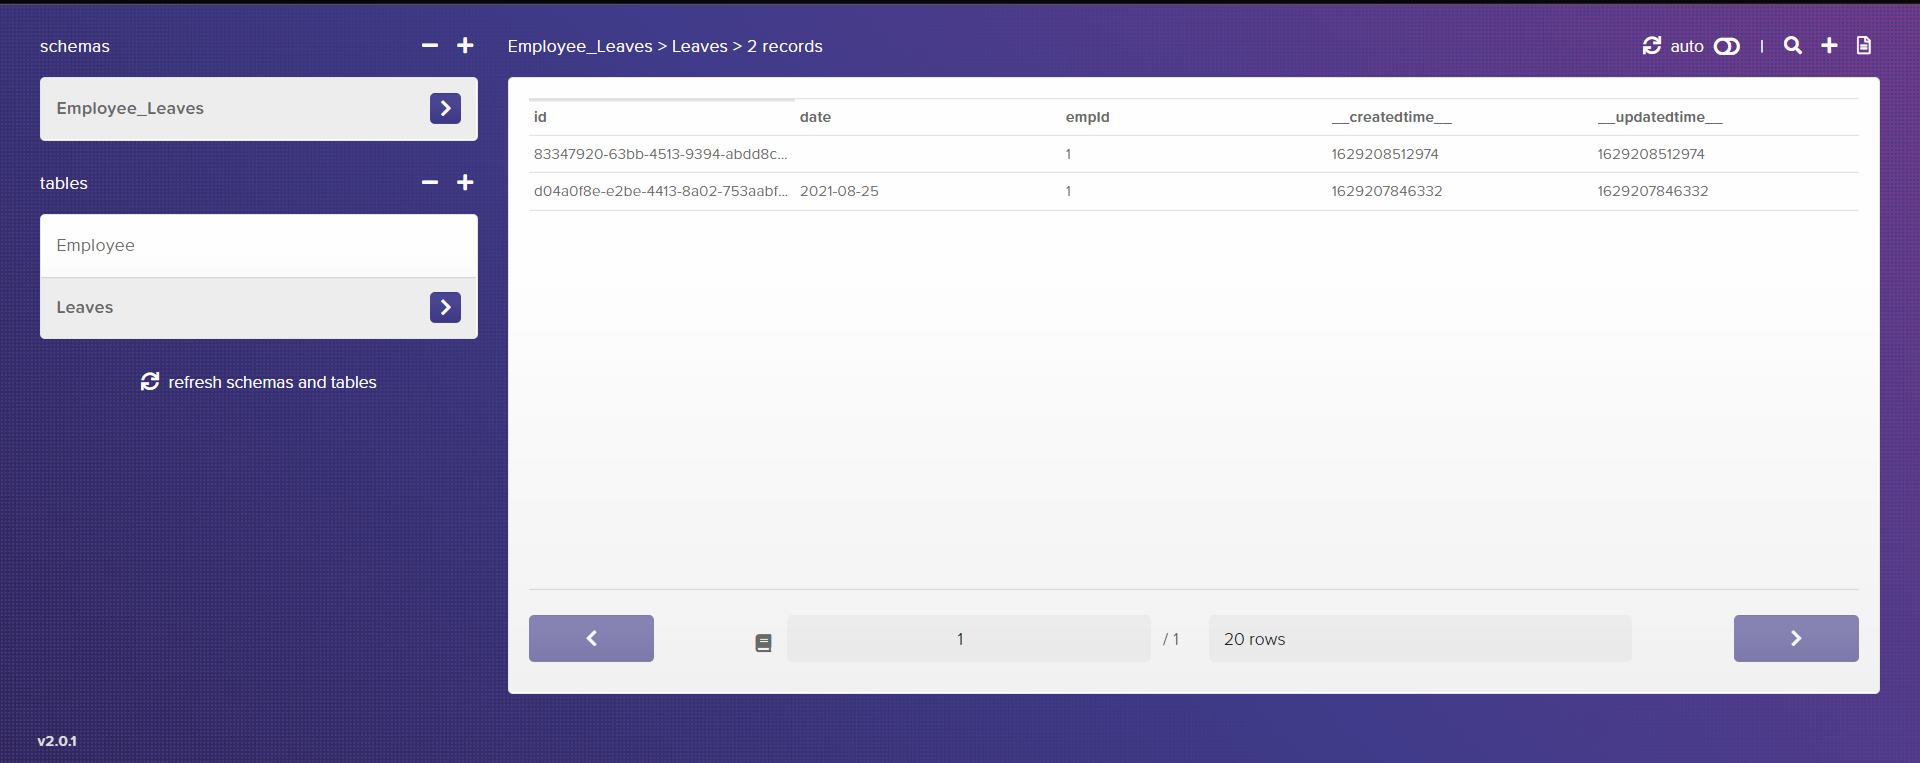
As you can see in the response, the employee whose ID is 1 now has two leaves. This same has been reflected in the Database:
/api/edit/leave
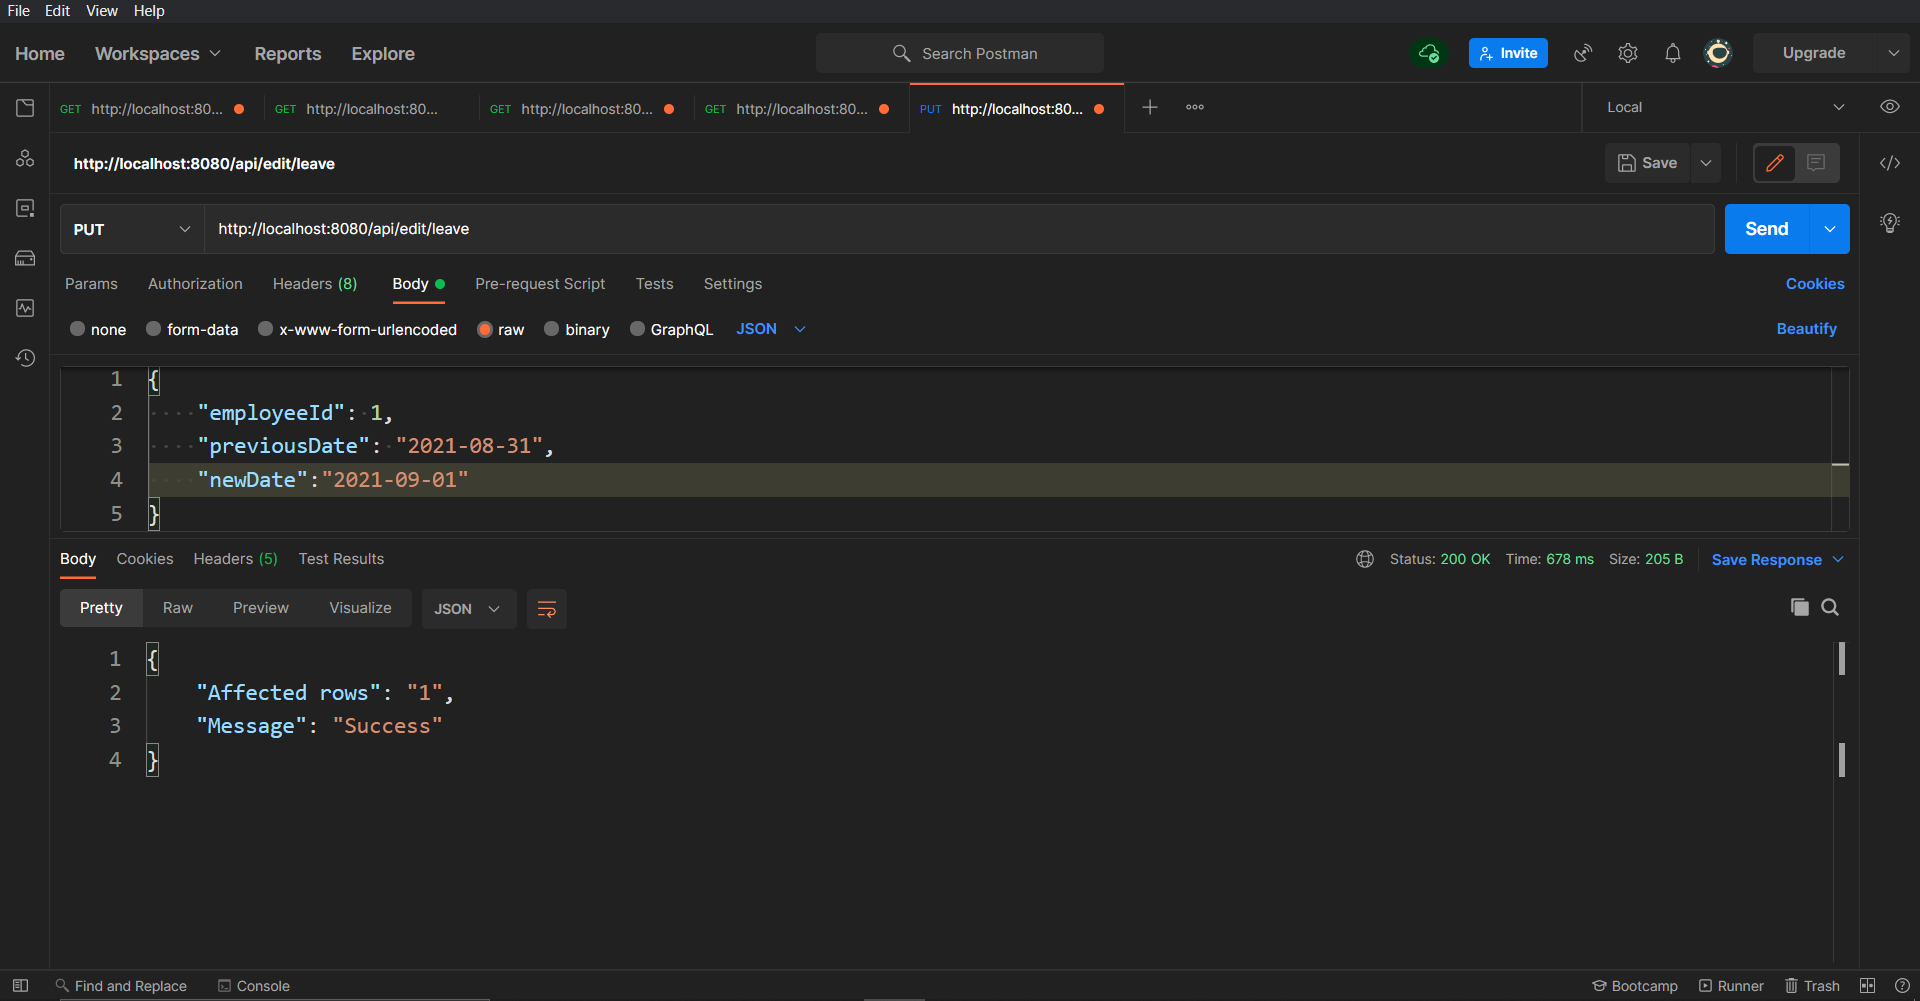
Again, let's check if the previous date has been modified or not, you will get:

This means that the edit functionality is also working fine.
/api/cancel/leave
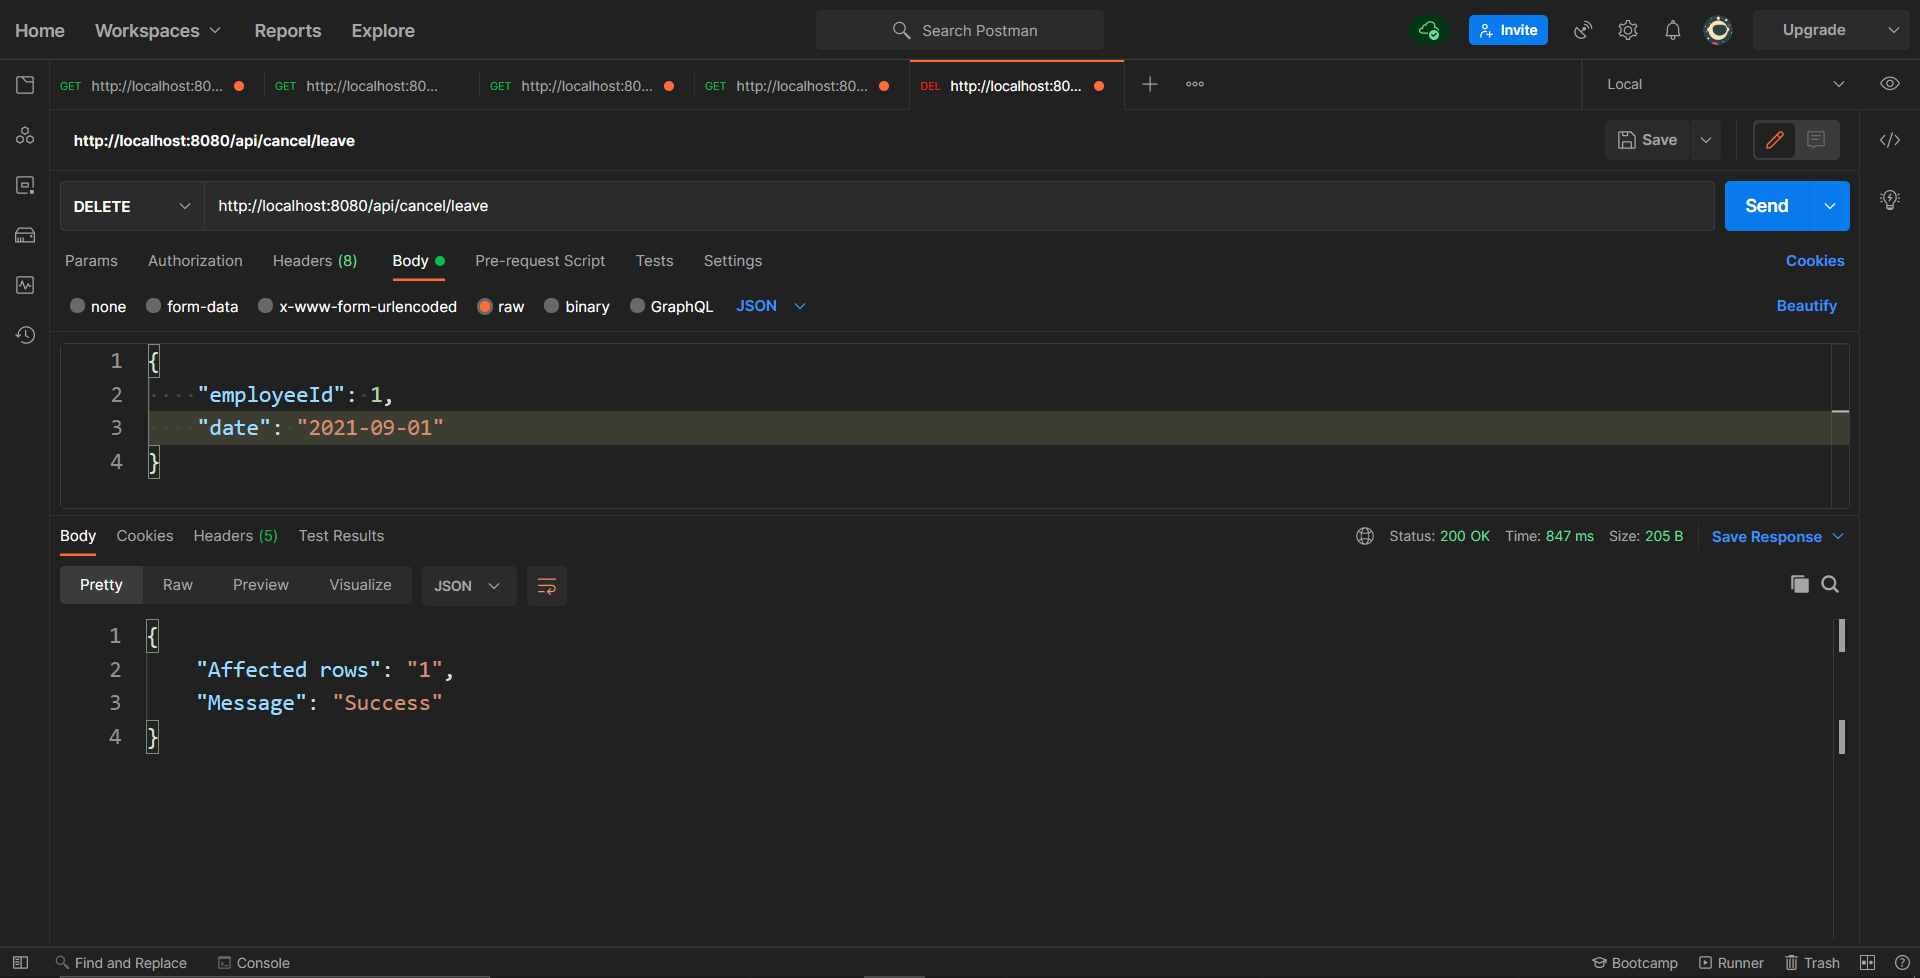
And now hitting the GET leaves API, you should only get one entry in response:
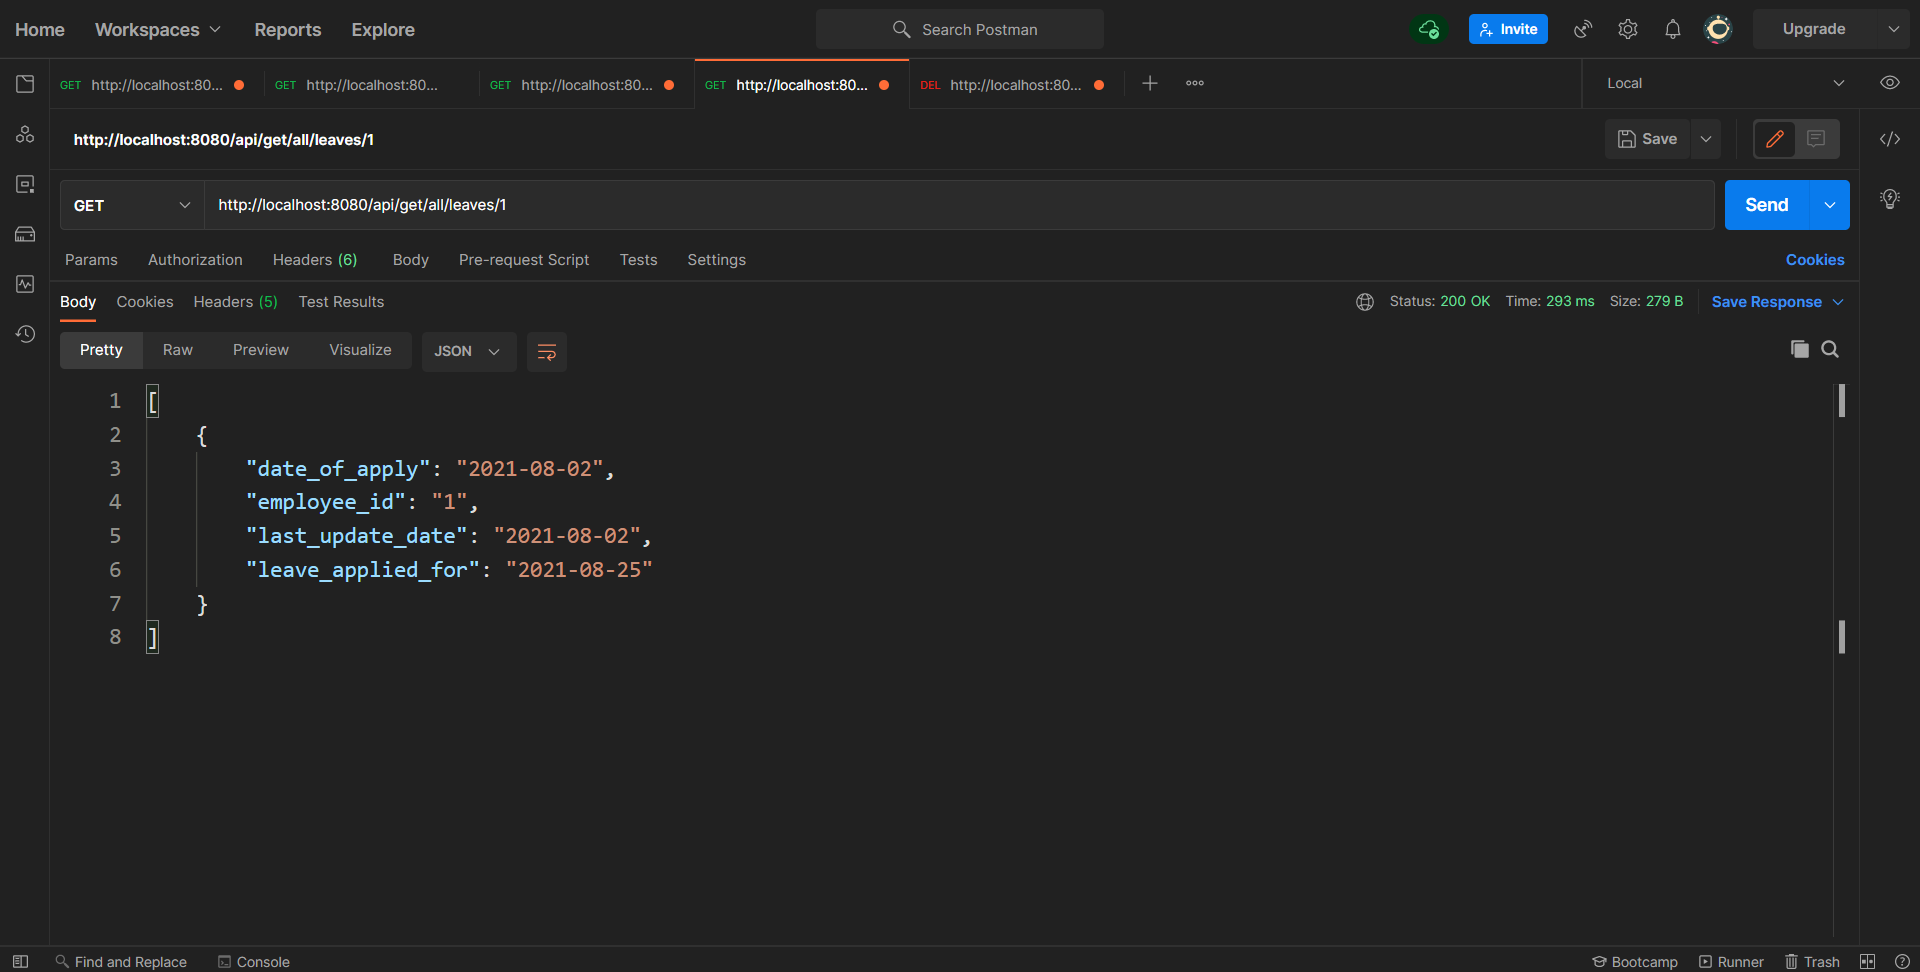
So, all your endpoints are working as expected in the local development environment. Let's move forward to see how you can deploy these APIs to the server.
Creating a JAR file
A JAR(Java Archive) is a package file format used to cluster together all the Java class files and associated metadata and resources (text, images, etc.) into one file to distribute application software or libraries on the Java platform.
In simple terms, a JAR file contains a compressed version of .class files, audio files, image files, or other directories.
To create a JAR file, make sure Maven is installed in your local development environment. If not, follow the below steps to configure maven (In Windows OS):
Navigate to the official Maven website and download the Maven zip file. For example: apache-maven-3.8.2-src.zip.
Unzip the contents and copy the path of the
binfolder inside.Open your System Environment Variables from the control panel, find the
PATHvariable then click on theEditbutton.In the "Edit environment variable" dialog, click on
Newand add the complete path of thebinfolder that you just copied.Finally, click on
OK. To test the configuration, open a new command prompt and typemvn –version. If a version is visible to you that means the configurations are correct.
If you're using any other OS, you can find the installation steps for that on the official Maven website. For more detailed steps, you can check out this article as well.
Next, to create a JAR file for your application run the command mvn clean install in your project's root directory.
A new folder with the name Target will be created. Inside this folder, you'll find your newly created JAR file.
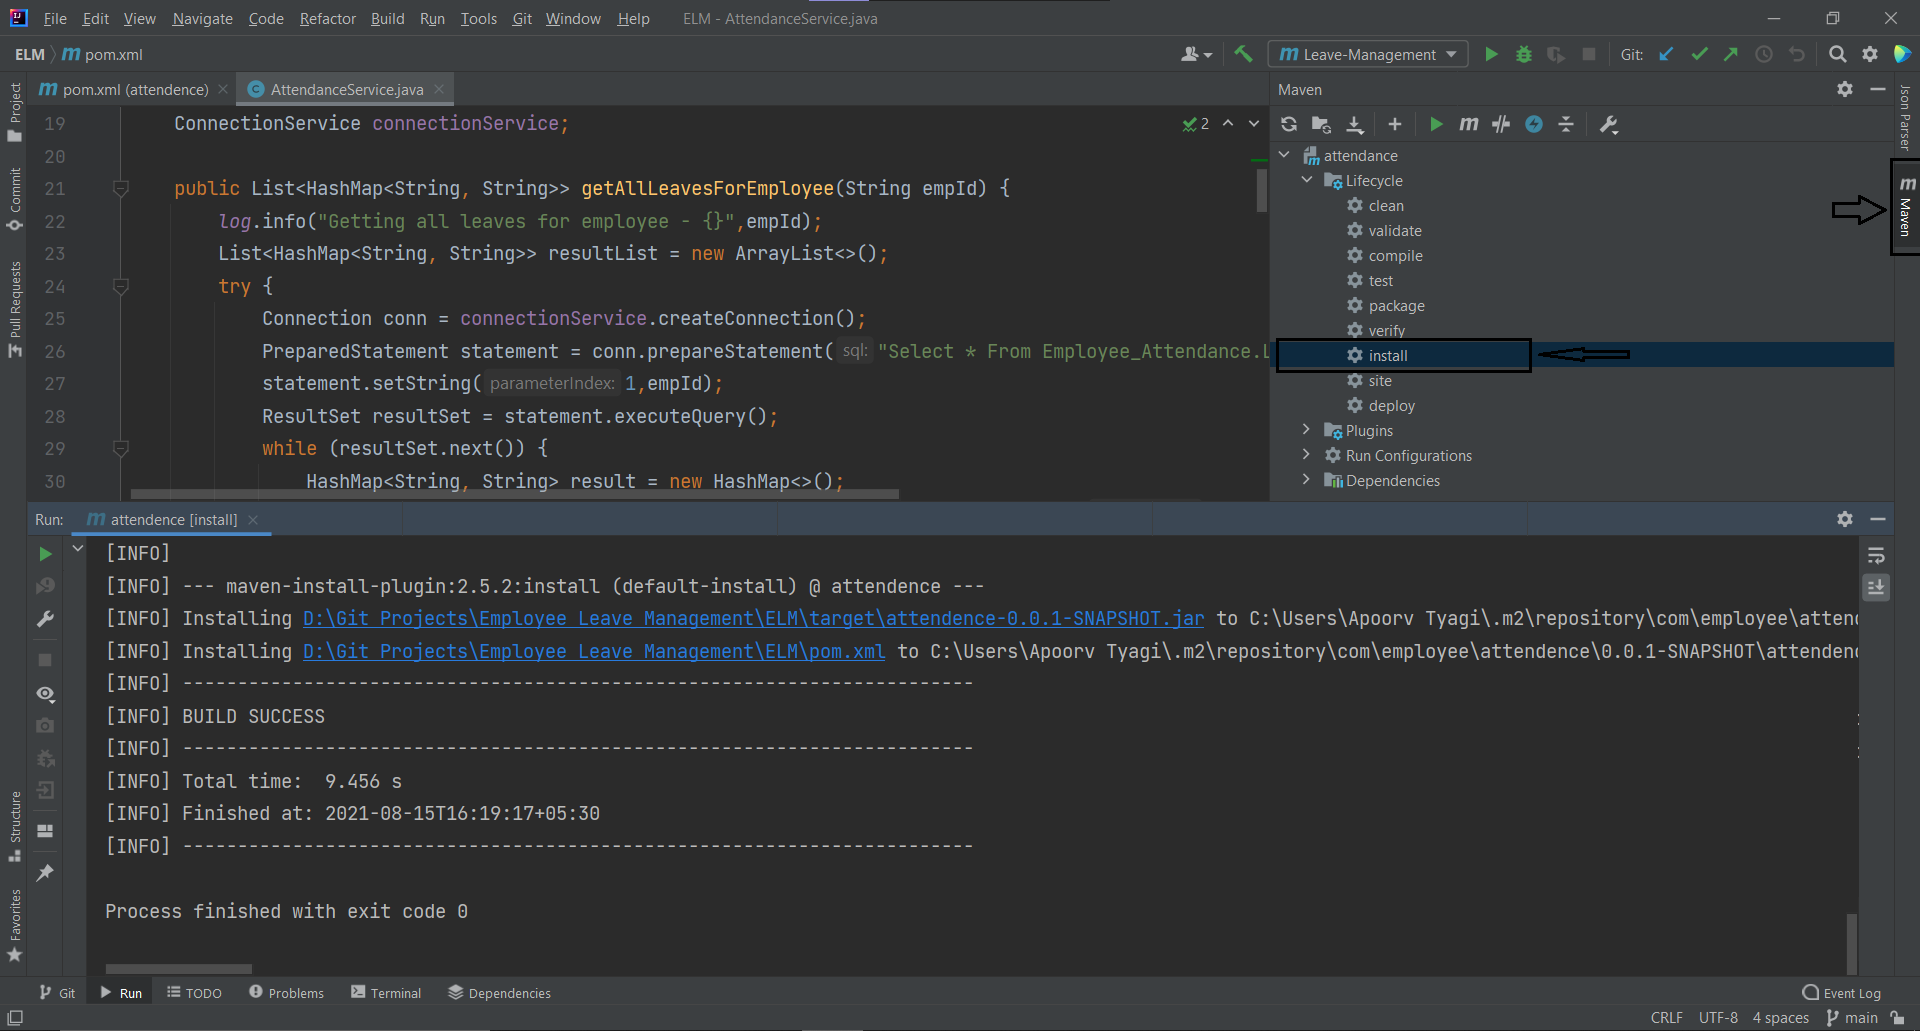
Another way to create a JAR file is from your IDE. For instance, in Intellij you can navigate to the maven tab from the sidebar menu and double click Install.
And here's how your complete project structure should look like by now:
├── lib
├── src
├── target
└── pom.xml
Inside src>main>java>com>employee>attendance you should have the following files and structure:
├── controller
│   └── AttendanceController.java
├── dto
│   └── EmployeeDataDTO.java
│   └── EmployeeEditDataDTO.java
├── service
│   └── AttendanceService.java
│   └── ConnectionService.java
└── AttendanceApplication.java
Deploying the application to AWS
The final step would be to deploy your code to a server. In this section, you'll learn how you can deploy the application to AWS Elastic Beanstalk.
Using Elastic Beanstalk, you can easily deploy and manage applications in the AWS Cloud without worrying about the infrastructure that runs those applications. It reduces management complexity without restricting choice or control. You simply upload your application, and Elastic Beanstalk automatically handles the details of capacity provisioning, load balancing, scaling, and application health monitoring.
Creating Elastic Beanstalk environment
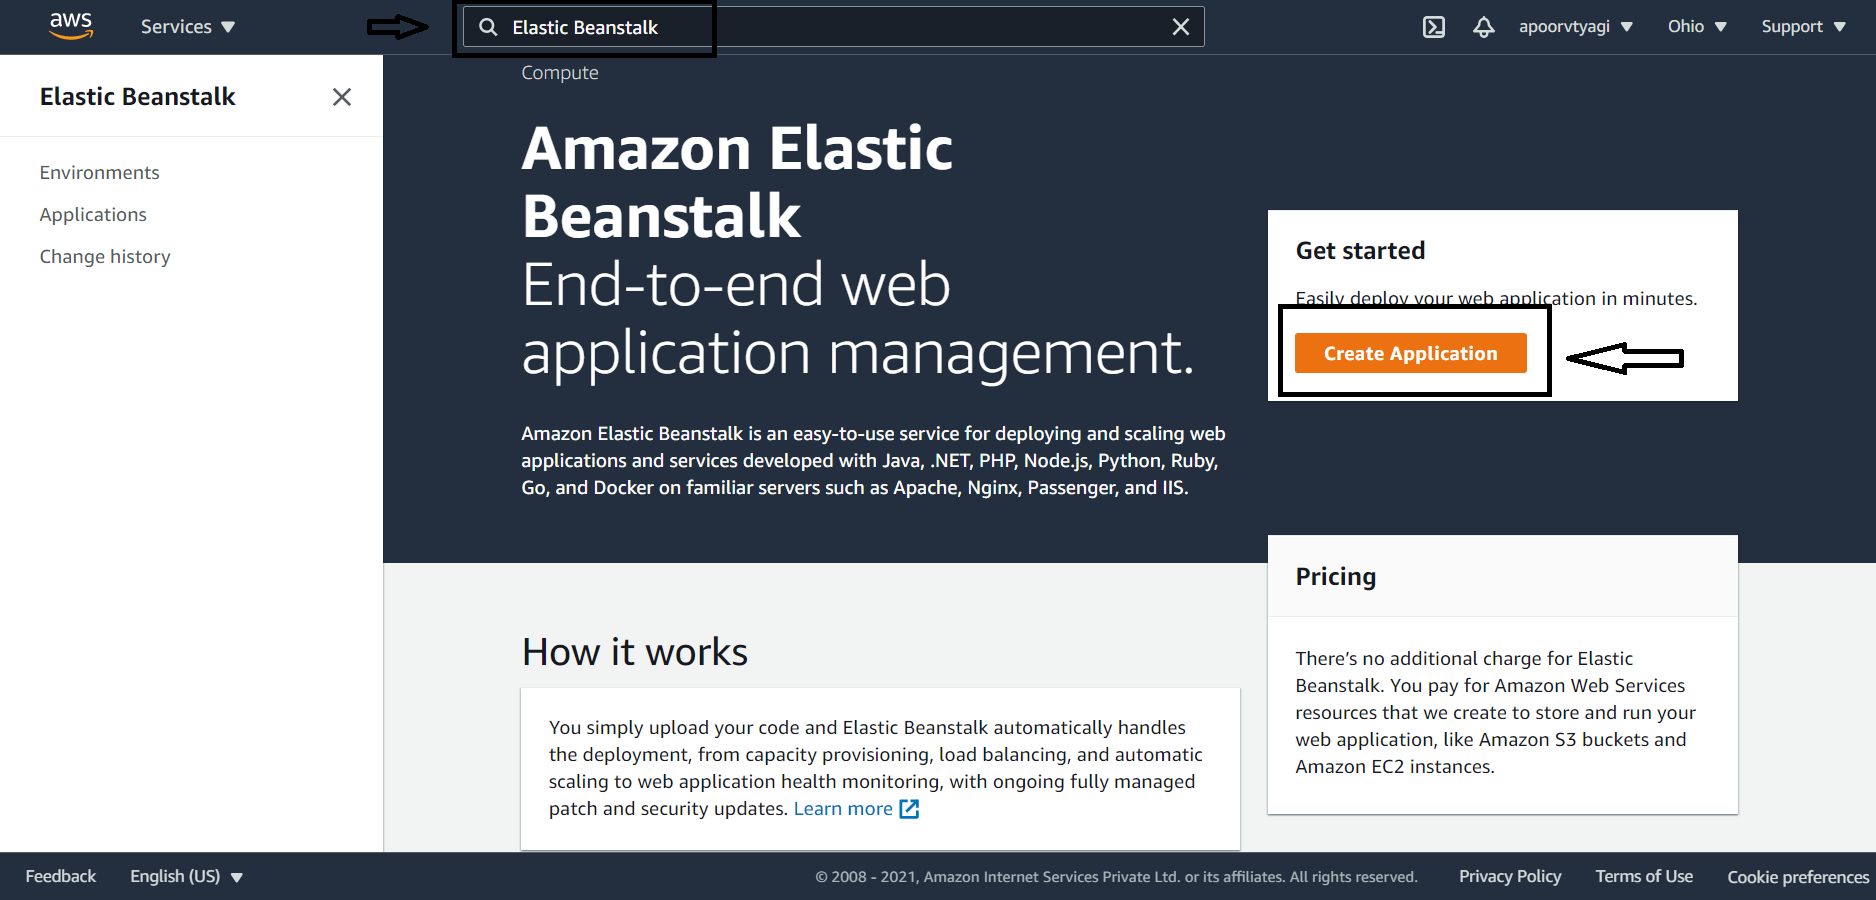
Once you are signed in to your AWS account, go to the search panel at the top and type "Elastic Beanstalk," and click create a new application on the top right.
It will ask for your:
- Application name
- Application tags(Not mandatory)
- Platform
- Application code
Enter your application name and optionally you can add up to 50 tags for the resources of your Elastic Beanstalk applications.
For the platform, select "Java" from the dropdown and it will automatically fill the "platform branch" and "version" on its own.
For the application code, select Upload your code and then choose the JAR file built in a previous step.
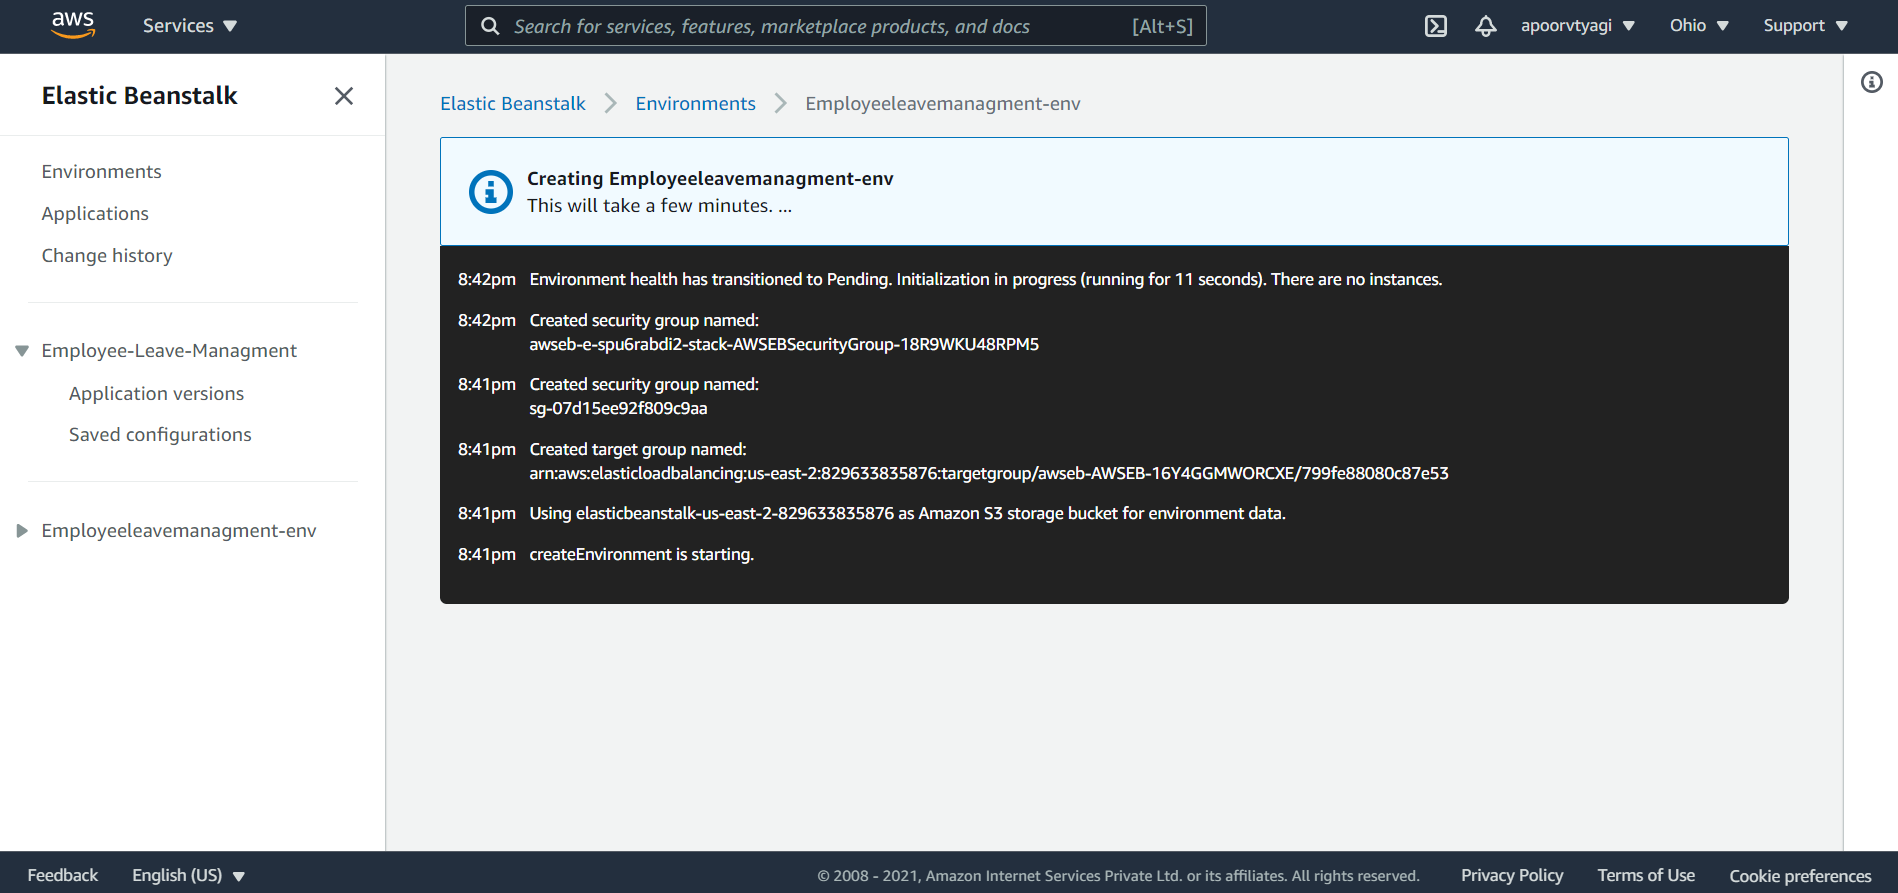
Review the configuration and launch the environment. As the application is being launched, you’ll see something similar to this on the environment dashboard:
Once the application resources get deployed and the environment has been created, you’ll notice the health of the application remains Severe. This is because the Spring Boot application still needs some configuration:
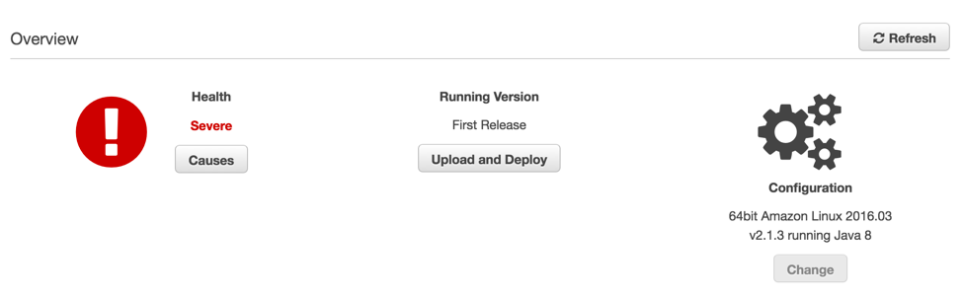
Let's look at how to solve it in the next section.
Configuring Spring Boot Through Environment Variables
By default, Spring Boot applications listen on port 8080 whereas Elastic Beanstalk expects the application to listen on port 5000.
There are two ways to fix this error, either you have to change the port Elastic Beanstalk is configured to use, or change the port the Spring Boot application listens on. For this tutorial, you will change the port the Spring Boot application listens on as it is easier.
For this, you have to define the SERVER_PORT environment variable in the Elastic Beanstalk's environment and set its value to 5000.
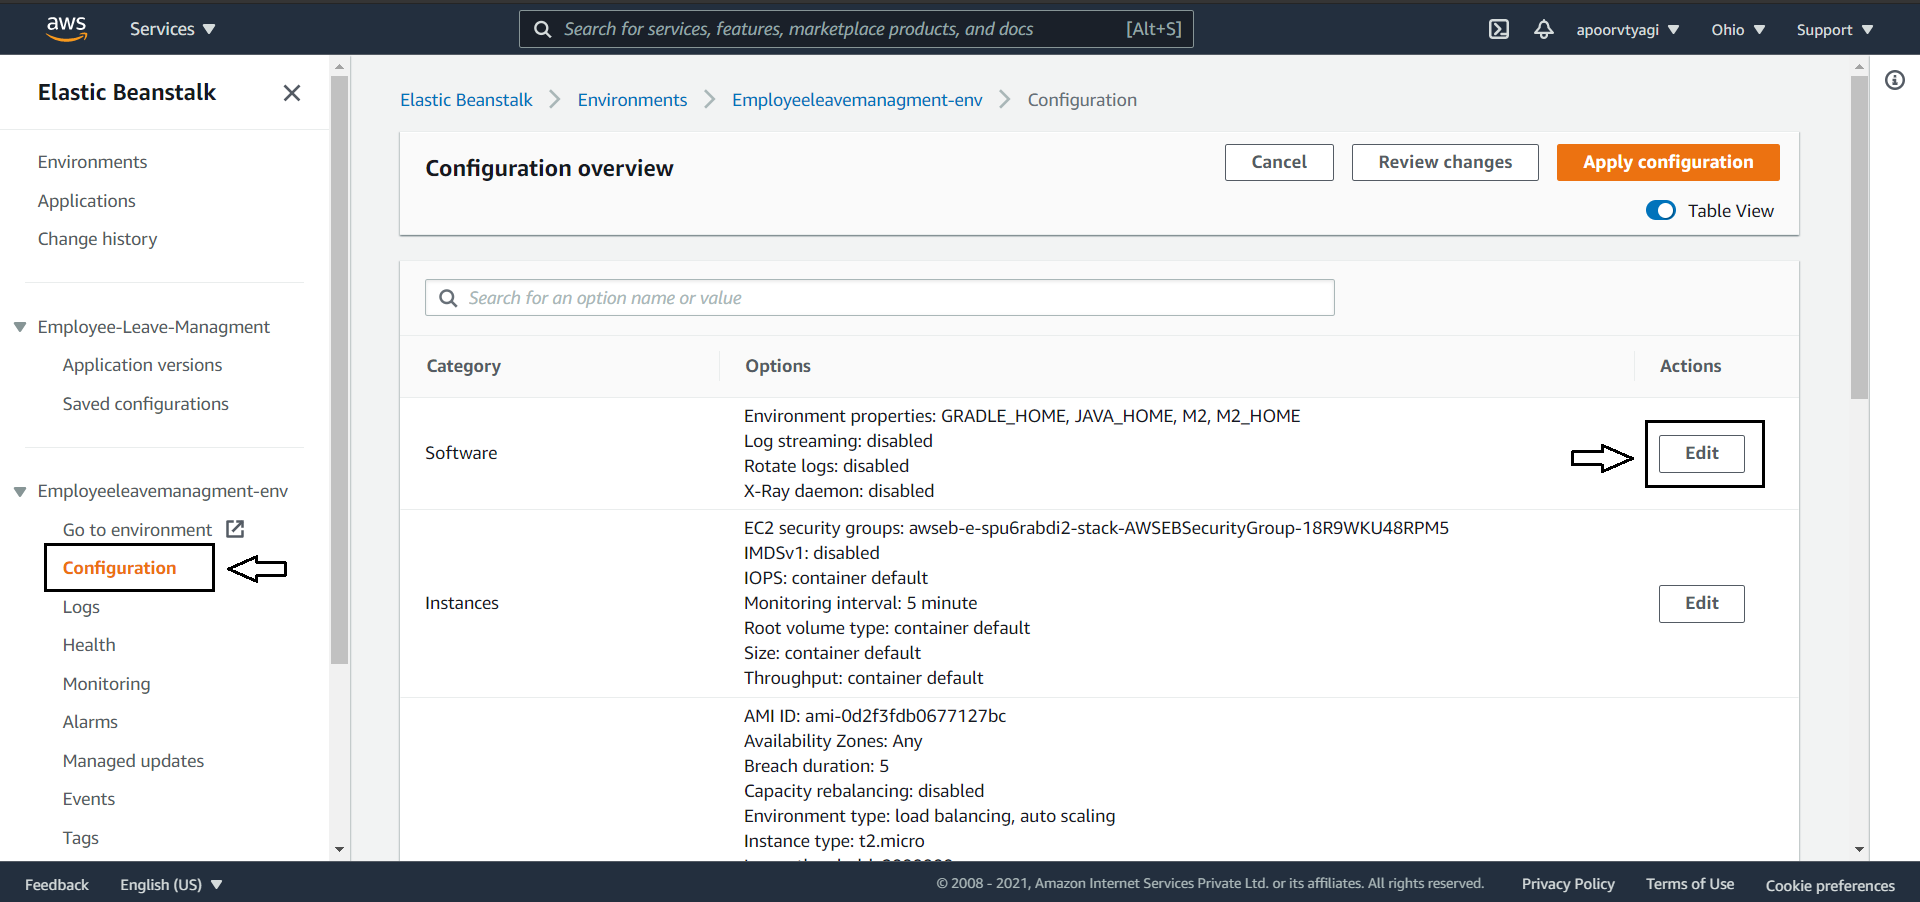
Click on the Configuration from the sidebar menu on your environment page.
On the Configuration page, you'll have software configuration, click on Edit:
Next, you’ll see that there are already some environment variables set. They are set automatically by Elastic Beanstalk when it is configured to use the Java platform.
To modify the port that Spring Boot listens on, as mentioned above you need to add a new environment variable by the name
SERVER_PORTwith its value 5000.
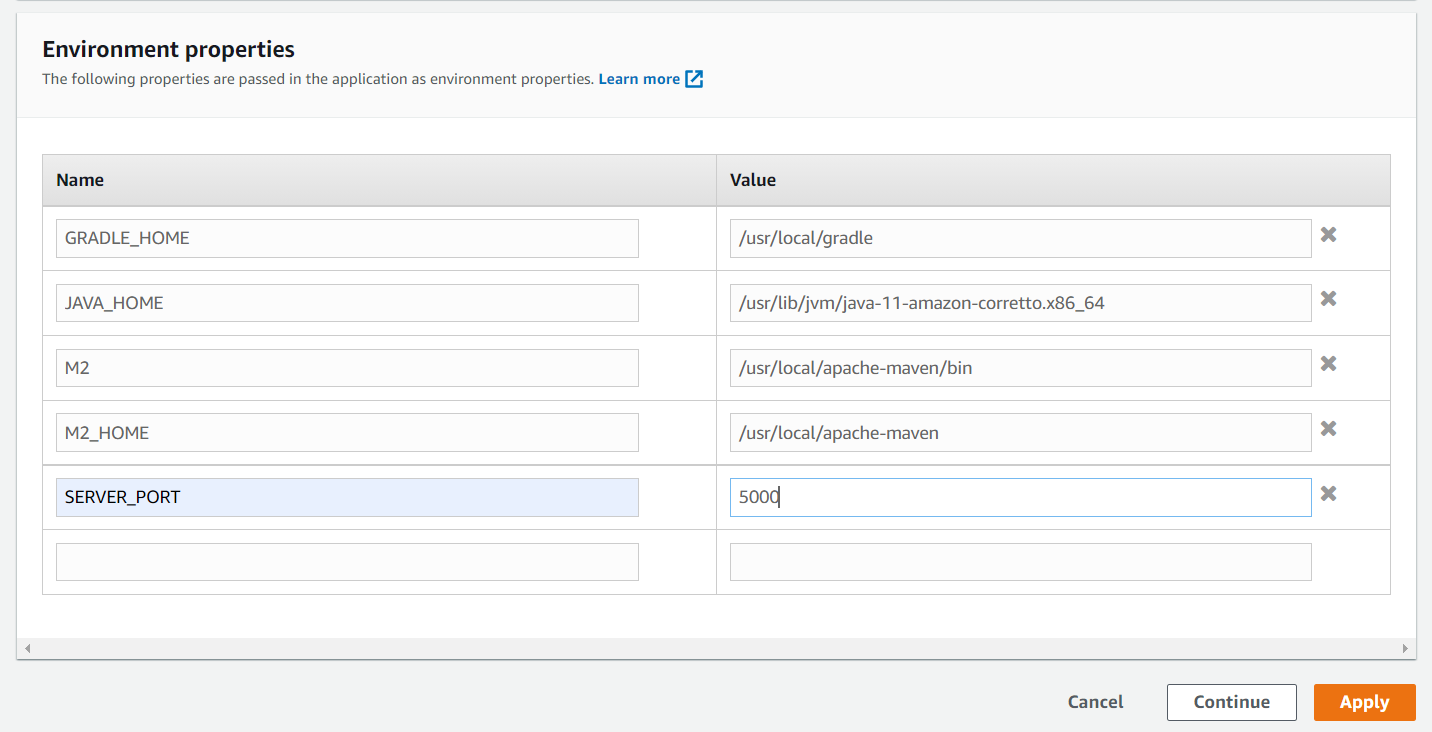
Click on Apply and the configuration change will make the application restart.
After it restarts, it will pick up the new configuration through the environment variables. In about a minute, you’ll get a healthy application instance up and running.
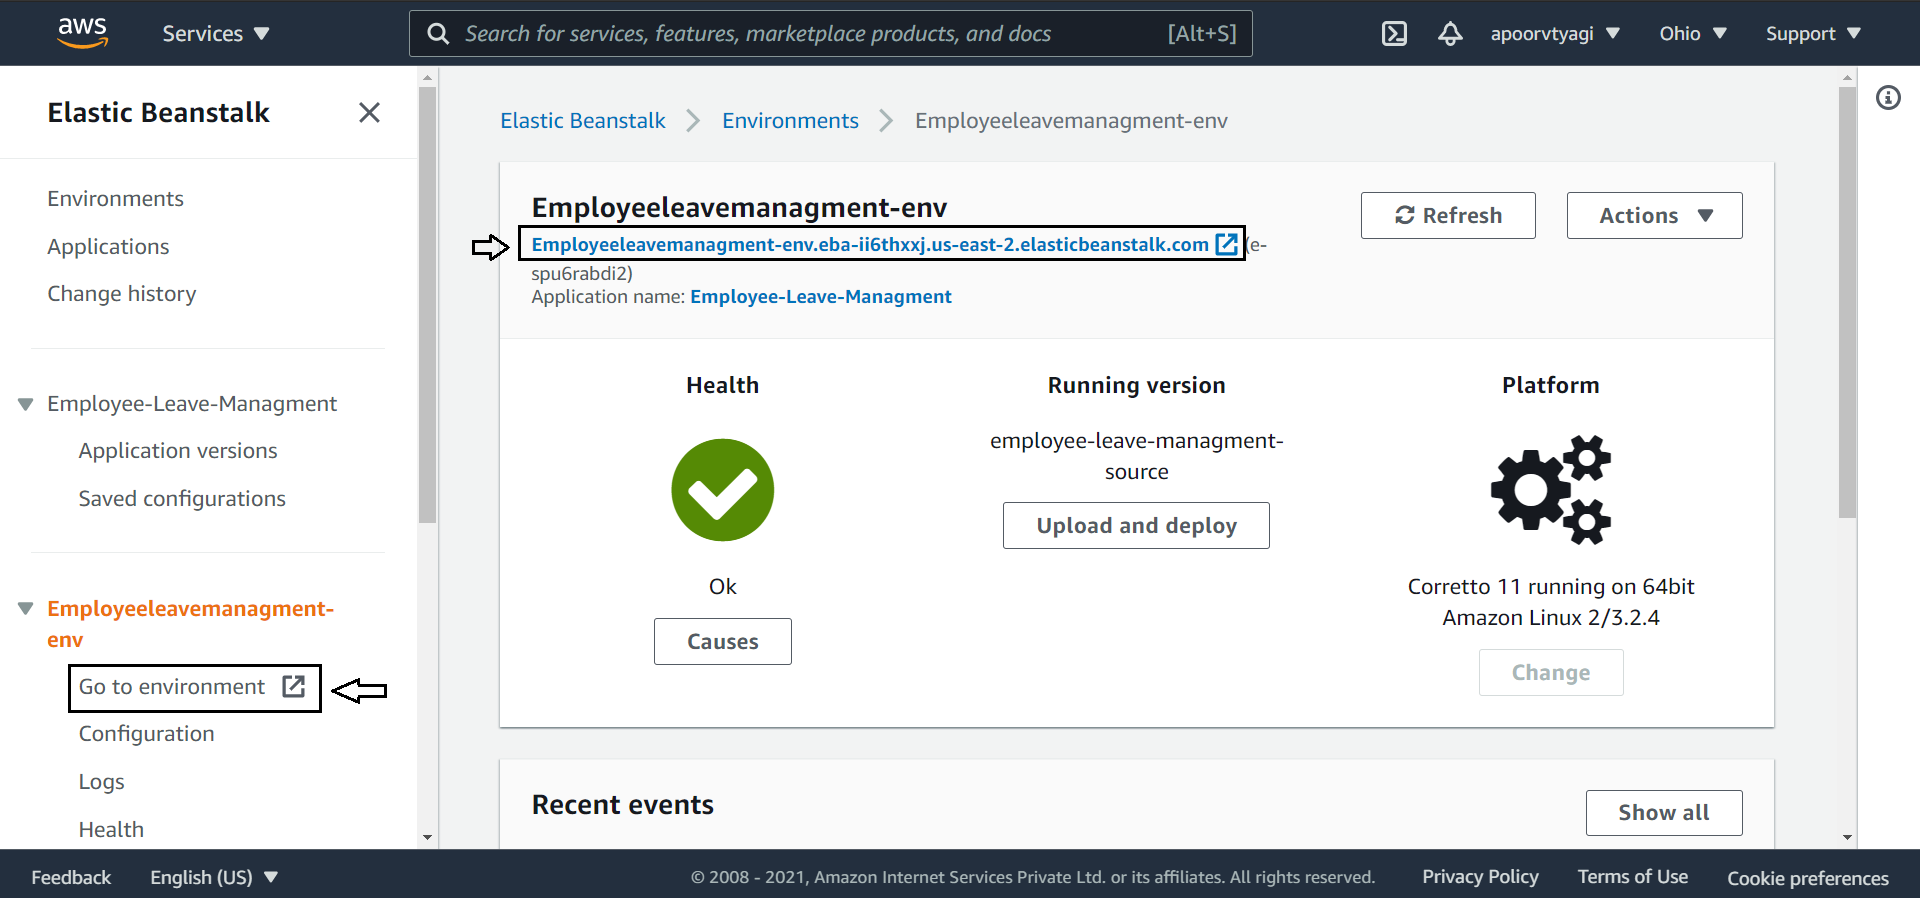
Testing the Application in the Cloud
Once deployed successfully, you will get your application base URL. You can also access the same from the sidebar:
Now replace the localhost:8080 with this new URL and try to access one of your API endpoints:
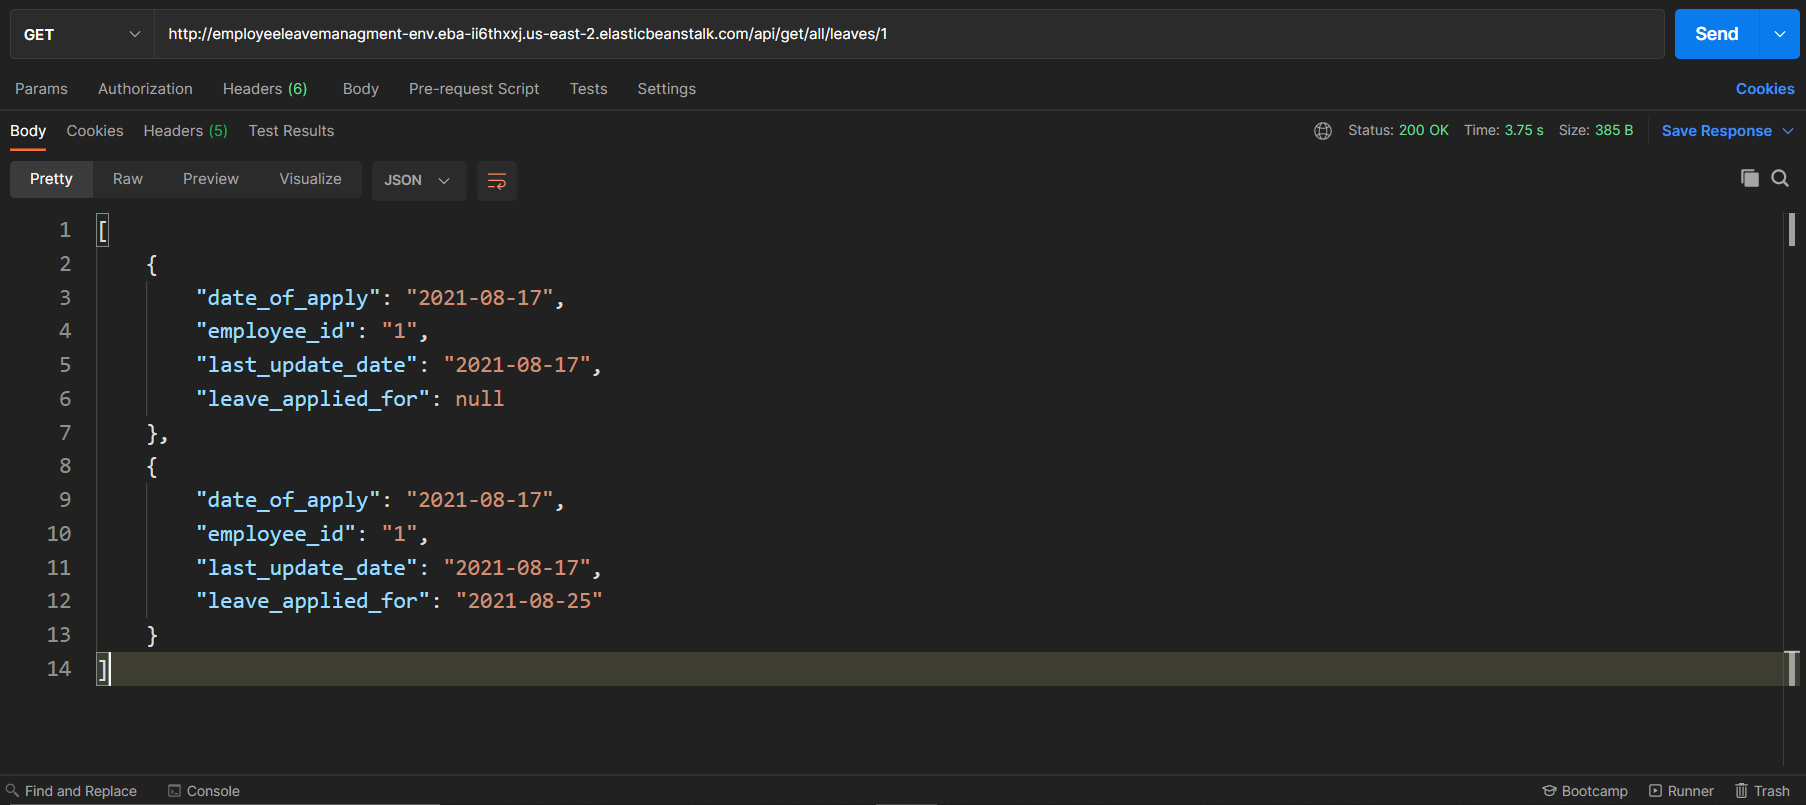
And you can get the correct response. This means that the application has been deployed successfully.
Conclusion
With this, you come to the end of this tutorial. The purpose of this tutorial was to use Spring Boot and HarperDB to create microservices. You also looked at the step-by-step process of how you can deploy the same application to AWS.
Both Spring Boot and AWS are used extensively in the industry but HarperDB might be new for you. The reason for choosing HarperDB is because of its easy integration with the Spring Boot app along with the notable features that I have mentioned at the beginning of this article.
I hope you learned something new. In case you get stuck somewhere, please feel free to shoot your doubts in the comments.
Also, the complete source code of the application used in this tutorial can be found in this GitHub Repository.